Koinkat

Local-first multi-currency personal finance manager. Built as a Tauri 2
desktop app. Your data lives on your device - no cloud sync, no telemetry,
no accounts system. The only data that leaves is what your bank sends you,
when you ask it to.
> Status: the current release is whatever is on the
> releases page.
> Filenames below are written as Koinkat__...; substitute the
> version you downloaded. If something does not behave as this guide
> describes, please
> open an issue.
To see what the app looks like, go to
marcosburlino.com/koinkat - every
screen, what each one is for, and a walkthrough of a transaction from bank
to budget.
This file is the setup manual. It covers installing the app and, in
detail, getting Enable Banking working, which is the only genuinely fiddly
part. If you only want to try Koinkat without a bank, you can skip straight
to First run and use manual
accounts.
Contents
What it does
Accounts in several currencies, with net worth converted to the one you
prefer. Budgets, split expenses, and a categorizer that learns from your
corrections. European banks over PSD2 through
Enable Banking, or manual accounts if you
would rather not connect anything.
The one design decision worth knowing before you start: every transaction
stores the exchange rate it was recorded at. Balances you looked at last
March still read the same today, because history is never re-converted at
today's rate.
For what each screen does, and a walkthrough of a transaction going from
bank to budget, see
marcosburlino.com/koinkat. The
rest of this file is setup.
How Koinkat handles your data
Koinkat is local-first. Your financial data lives in a database file on
your own computer. There is no Koinkat server, no account with us, no
sign-up, no telemetry, and no analytics. Nobody involved in this project
can see your data.
That said, "local-first" does not mean the app never touches the
internet. Here is every connection the app itself makes, verified from
the source code:
| Connection | When | What is sent | What is not sent |
|---|
api.enablebanking.com | Only if you link a bank, during linking and syncs | Requests signed with your own Enable Banking application ID, the bank you picked, and session identifiers; the API returns your balances and transactions | Your online-banking username and password - you enter those on your bank's own website, never in Koinkat |
cdn.jsdelivr.net (fallback: *.currency-api.pages.dev) | On app start and before syncs | A request for the day's public exchange-rate table (.../currency-api@/v1/currencies/usd.json) | Anything about you - the URL contains only the date; not even your chosen currency |
Your bank's authorization page, then marcosburlino.github.io/koinkat-callback/ | Only during bank linking, in your regular browser (not inside the app) | The bank redirects your browser to the callback page with a one-time authorization code; the page is a single static file that makes zero further network requests and hands the code back to the app locally. GitHub Pages serves that page - see the note below | The code is never sent anywhere by the page, and it is useless without the private key that exists only on your machine |
Like every internet request, these servers see your IP address. Beyond
the list above the app contacts nothing: there are no update pings, no
crash reporting and no tracking - there is no telemetry endpoint to
disable because none was ever built.
Two independent controls keep the app's own traffic to the hosts above:
the webview's content-security policy, and the Tauri capability
allowlist, which scopes the Rust HTTP client to the same three hosts.
Neither control applies to the Rust dependency tree itself - as in any
native application, a compromised crate could open a socket directly.
That is the trust you extend to the dependency set of any desktop app
you run; Cargo.lock and package-lock.json are in this repository so
the set can be audited.
Separately, Koinkat can ask your operating system to open a link in your
normal browser: your bank's authorization page, pages on Enable Banking's
site (the control panel, and their consent list if a disconnect cannot
reach them), and the "report an issue" link on the crash screen. Those
are ordinary browser visits, subject to whatever those sites do.
About the callback page. It is served from GitHub Pages, so GitHub
records the request URL - including the authorization code - the same way
it records a request for any page it hosts. GitHub's own documentation
says a visitor's IP address is logged and stored for security purposes;
it provides no request logs to the owner of a Pages site, so nobody on
this project can read them. The code itself is single-use, expires
quickly, and cannot be exchanged for anything without the private key
that never leaves your machine. If you would rather not rely on any of
that, host your own copy of the page and put its URL in the Redirect URL
field - see Step 3.
Where things physically live:
| What | Where |
|---|
Your database (koinkat.db) - Windows | C:\Users\\AppData\Roaming\com.koinkat.app\koinkat.db |
| Your database - macOS | ~/Library/Application Support/com.koinkat.app/koinkat.db |
| Your database - Linux | ~/.config/com.koinkat.app/koinkat.db |
| Automatic backups | A backups folder inside that same folder. One full copy of the database for each day you use the app (refreshed after each bank sync), plus one before you delete a user or a workspace; the newest 10 are kept. Settings > Backup & export shows them and has Back up now. |
| Your Enable Banking private key | The OS credential store: Windows Credential Manager, macOS Keychain, or the Linux secret service (GNOME Keyring / KWallet). Not in the database. If no credential store is available, Koinkat falls back to the database and says so in Settings. |
The database is not encrypted at rest - anyone with access to your OS
user account can read it, and the same goes for its automatic backups. Use OS disk encryption (BitLocker, FileVault,
LUKS) if that matters to you. See Security model for
the rest of the picture.
Install
There are two ways to get Koinkat. Most people want Path A: download a
ready-made installer. Path B builds the app from this source code, which
takes longer but means you run exactly what you can read.
Path A: install the released app
Every release of Koinkat comes with ready-made installer files attached
to it. The steps below are complete for each operating system, from
finding the right file to launching the installed app, so jump straight
to the section for your system.
Why the Windows installer shows a security warning
macOS builds are signed with an Apple Developer ID Application
certificate and notarized by Apple from 0.1.1 onward, so they open with
no warning at all. Windows is a different story.
Windows skips its warning only for installers whose publisher bought a
code-signing certificate, which carries a meaningful recurring fee.
Koinkat is free, open-source software with no revenue, so that money is
deliberately not spent on Windows signing. Signing changes the label the
operating system puts on an app, not what the app does: the full source
code is public, and Path B below builds the identical app from it. The
Windows warning is therefore expected, and there are two ways to deal
with it: installing through winget, the package manager built into
Windows, shows no warning at all and is the recommended path; the
classic download steps show how to proceed past the warning if you
prefer the installer file.
Windows
The recommended way: install with winget, no warning
Koinkat is published in the Windows Package Manager community
repository. The winget tool comes preinstalled on Windows 11 and on
current Windows 10, and installing this way shows no security warning:
winget downloads the installer from the official GitHub release and
verifies it against the hash Microsoft has on record before running it.
-
Open PowerShell: press the Start key, type powershell,
press Enter.
-
Run this command and wait for it to finish:
winget install MarcoSburlino.Koinkat
-
Start the app: press the Start key, type Koinkat, press
Enter. Koinkat is now in your Start menu like any other program.
If PowerShell answers that winget is not recognized, install the free
App Installer from the Microsoft Store, close PowerShell, reopen
it, and run the command again. Updating to a newer Koinkat later is one
command too: winget upgrade MarcoSburlino.Koinkat.
The classic way: download the installer file
- In your browser, open the latest release page:
github.com/MarcoSburlino/Koinkat/releases/latest.
- Scroll past the release description to the Assets section. If
you only see the word "Assets" with a number next to it, click it -
the list of downloadable files unfolds.
- Click the file named
Koinkat__x64-setup.exe. The version
in the middle changes with every release; the file you want is the
one ending in _x64-setup.exe. Ignore the two "Source code"
entries at the bottom of the list - they contain the program's
source, not an installer. (If your organization prefers MSI
packages, the file ending in _x64_en-US.msi installs the same
app.)
- The browser saves the file to your Downloads folder. Open it:
open File Explorer (the folder icon in the taskbar) and click
Downloads in the left sidebar - or press Ctrl+J in the browser
and open the file from its download list.
- Double-click the installer you just downloaded.
- A blue dialog titled "Windows protected your PC" appears, saying
Microsoft Defender SmartScreen prevented an unrecognized app from
starting. This is the unsigned-app warning explained above.
- Click the small More info link in that dialog. A Run anyway
button appears; click it.
- The installer opens. Accept the defaults and click through to
Finish.
- To start the app: press the Start key, type
Koinkat, and press
Enter. Koinkat is now in your Start menu like any other program.
Alternative: download from PowerShell to skip the SmartScreen dialog
The SmartScreen block is triggered by a "downloaded from the internet"
marker that browsers attach to files. Windows' built-in curl.exe does
not attach it, so an installer downloaded this way starts without the
blue SmartScreen dialog. Open PowerShell (Start key, type
powershell, Enter) and run these, one block at a time. The first line
asks GitHub which installer is current, so this always fetches the newest
release rather than a version pinned in this document:
cd ~\Downloads
$url = (Invoke-RestMethod https://api.github.com/repos/MarcoSburlino/Koinkat/releases/latest).assets |
  Where-Object { $_.name -like '*_x64-setup.exe' } |
  Select-Object -First 1 -ExpandProperty browser_download_url
curl.exe -L -o Koinkat-setup.exe $url
Then run .\Koinkat-setup.exe (or double-click it in Downloads) and
continue from step 8 above. One honest caveat: this skips the
SmartScreen dialog, but Microsoft Defender and third-party antivirus
programs scan every file regardless of how it was downloaded, so an
aggressive antivirus can still flag the unsigned installer either way.
macOS
Koinkat runs on macOS 11 or later, on both Apple Silicon and Intel
Macs: the download is a universal build containing both architectures.
- In your browser, open the latest release page:
github.com/MarcoSburlino/Koinkat/releases/latest.
- Scroll past the release description to the Assets section. If
you only see the word "Assets" with a number next to it, click it -
the list of downloadable files unfolds.
- Click the file ending in
.dmg (named
Koinkat__universal.dmg). Ignore the "Source code" entries -
they are not installers.
- Open your Downloads folder (the Downloads stack at the right end
of the Dock, or Finder and then Downloads in the sidebar) and
double-click the
.dmg file.
- A window opens showing the Koinkat icon and an Applications folder
shortcut. Drag the Koinkat icon onto Applications.
- Open Launchpad (or Finder > Applications) and click Koinkat. The
app is signed with an Apple Developer ID Application certificate and
notarized by Apple, so it opens normally, with no security dialog and
nothing to work around.
Alternative: install from Terminal
The releases page also carries a .app.tar.gz archive of the same
application, for anyone who prefers the command line. Open Terminal
(Cmd+Space, type terminal, Enter) and run these one at a time. The
first command asks GitHub which archive is current, so this always
fetches the newest release rather than a version pinned in this document:
cd ~/Downloads
url=$(curl -fsSL https://api.github.com/repos/MarcoSburlino/Koinkat/releases/latest \
  | grep -o '"browser_download_url": *"[^"]*_universal\.app\.tar\.gz"' | cut -d'"' -f4)
curl -L -o Koinkat.app.tar.gz "$url"
tar -xzf Koinkat.app.tar.gz
mv Koinkat.app /Applications/
Then open Koinkat from Launchpad or Applications as normal.
Still running 0.1.0? That build predates code signing and was Apple
Silicon only, so macOS refuses it with "Koinkat is damaged and can't be
opened" or an unidentified-developer block. Updating to 0.1.1 or later
resolves both.
Linux
- In your browser, open the latest release page:
github.com/MarcoSburlino/Koinkat/releases/latest.
- Scroll past the release description to the Assets section; click
the word "Assets" if the file list is folded away.
- Download the format that fits your distribution - the bullets below
explain each of the three. Ignore the "Source code" entries; they
are not installers.
The commands below assume the file landed in your Downloads folder.
Open a terminal (usually Ctrl+Alt+T) and move there first:
cd ~/Downloads
- AppImage (
Koinkat__amd64.AppImage) - a single file that
runs on almost any distribution without installing. Mark it executable
once, then run it:
chmod +x Koinkat__amd64.AppImage
./Koinkat__amd64.AppImage
If it refuses to start with a FUSE error ("AppImages require FUSE to
run"), install the FUSE 2 compatibility library, which recent
Ubuntu/Debian releases no longer preinstall (sudo apt install libfuse2), or run it once without installing anything:
./Koinkat__amd64.AppImage --appimage-extract-and-run
- Debian / Ubuntu (
Koinkat__amd64.deb):
sudo apt install ./Koinkat__amd64.deb
- Fedora / openSUSE (
Koinkat--1.x86_64.rpm):
sudo rpm -i Koinkat--1.x86_64.rpm
After the deb or rpm install, Koinkat appears in your application menu.
Path B: build from source
This path assumes nothing: if you have never used a terminal, start
here.
Opening a terminal:
- Windows: press the Start key, type
powershell, press Enter.
- macOS: press Cmd+Space, type
terminal, press Enter.
- Linux: usually Ctrl+Alt+T, or find "Terminal" in your app menu.
You type commands at the prompt and press Enter to run them. Copy the
commands below one at a time.
1. Install the prerequisites
Koinkat is a Tauri app: the interface is web code (needs Node.js) inside
a small native shell (needs Rust and your platform's build tools). The
versions below are the ones this repository's automated builds use and
prove on every change: Node.js 22 and the stable Rust toolchain.
Windows
- Microsoft C++ Build Tools - download the Build Tools installer
from visualstudio.microsoft.com
and during installation check the Desktop development with C++
workload.
- WebView2 - already included in Windows 10 (1803+) and Windows 11.
Nothing to do on a current system.
- Rust - in PowerShell:
winget install --id Rustlang.Rustup
Then close and reopen the terminal and make sure the MSVC toolchain
is the default:
rustup default stable-msvc
- Node.js 22 - download the LTS installer from
nodejs.org and run it.
- Git - if you don't have it:
winget install --id Git.Git
Verify everything (each command prints a version; if one says "not
recognized", close and reopen the terminal first):
node --version
Expected shape: v22.x.x.
rustc --version
Expected shape: rustc 1.xx.x.
git --version
macOS
- Xcode Command Line Tools:
xcode-select --install
- Rust:
curl --proto '=https' --tlsv1.2 https://sh.rustup.rs -sSf | sh
Accept the default installation, then close and reopen the terminal.
3. Node.js 22 - download the LTS installer from
nodejs.org. Git ships with the Command Line
Tools.
Verify: node --version (expect v22.x.x), rustc --version,
git --version.
Linux (Debian/Ubuntu)
- System libraries - this is the Tauri-documented set plus the
extras this repository's automated builds install to build
successfully:
sudo apt update
sudo apt install libwebkit2gtk-4.1-dev build-essential curl wget file libxdo-dev libssl-dev libayatana-appindicator3-dev librsvg2-dev patchelf xdg-utils libdbus-1-dev pkg-config
- Rust:
curl --proto '=https' --tlsv1.2 https://sh.rustup.rs -sSf | sh
- Node.js 22 - distribution packages are often older; follow the
install instructions on nodejs.org for version
22 (or use a version manager like nvm).
Verify: node --version (expect v22.x.x), rustc --version,
git --version.
2. Get the code and build
git clone https://github.com/MarcoSburlino/Koinkat.git
Downloads the source code into a Koinkat folder.
cd Koinkat
Moves the terminal into that folder.
npm install
Installs the JavaScript dependencies (a few minutes; success ends with a
line like added NNN packages).
npm run tauri:build
Builds the production app. The first build compiles the entire Rust
side and takes a while - 10 to 30 minutes is normal. Later builds
reuse that work and are much faster. Success ends with the bundler
listing the installer files it produced.
3. Find what you built
Installers land under src-tauri/target/release/bundle/:
- Windows:
bundle\nsis\Koinkat__x64-setup.exe and
bundle\msi\Koinkat__x64_en-US.msi
- macOS:
bundle/dmg/Koinkat__.dmg and
bundle/macos/Koinkat.app
- Linux:
bundle/appimage/, bundle/deb/, bundle/rpm/
Run the installer (your own build triggers the same unsigned-app
warnings as Path A) or, for development, skip installing entirely:
npm run tauri:dev
opens the app in development mode with hot reload and fixture data
("mocks") instead of real bank calls - no credentials needed. See
docs/development.md for the full development
setup, including how to test the real Enable Banking client in dev.
First run: setting up inside the app
-
User profile. On first launch the app shows a single field asking
for your name. That is the whole "account": no password, no email, no
online registration. It is a label stored on your computer so the app
can greet you and support multiple people sharing one machine. It is
not a login to any online service.
-
Workspace hub. Next you land on the workspace hub, where you
create your first workspace. Every workspace is fully isolated: its
own bank connections, accounts, categories, budgets, and rules. Two
cards are offered in the released app:
- Connect a bank - link a real bank through Enable Banking. This
needs credentials you create in
Connecting a bank, so read that section
first.
- Manual - track accounts and transactions by hand. No bank, no
credentials, works immediately.
You can always add more workspaces later. Starting with a Manual
workspace and adding a bank-linked one once your Enable Banking
application is ready is a perfectly good path.
-
Workspace basics. The creation form asks for a workspace name,
your preferred currency (what mixed-currency totals are converted
into for display), the decimal separator you are used to (comma or
point), and a light or dark theme. None of these are permanent
choices: all four live in Settings afterwards and can be changed
per workspace at any time.
One related thing that is permanent, so it is worth knowing early:
the currency of an individual account is fixed when you create
that account, and the same goes for a transaction. This is
deliberate. Koinkat stores each amount in the currency it actually
happened in, so historical balances stay reproducible instead of
silently shifting whenever exchange rates move. Changing your
workspace's preferred currency re-displays those stored amounts; it
never rewrites them.
-
Dashboard. After creation you land on the Dashboard. The database
file now exists at the path listed in
How Koinkat handles your data.
Connecting a bank
This is the longest part of setup, so take it step by step; it is a
one-time job of roughly 15 to 20 minutes. Koinkat deliberately ships
with no bank-access credentials of its own. You create a personal,
free "application" with Enable Banking, and that application - your ID,
your key - is what authorizes access to your accounts. Nothing is shared
with other users or with the Koinkat project.
By the end of this section you will have three things, and you will have
used them in Koinkat:
- An Enable Banking application ID (a long identifier).
- A private key file ending in
.pem, downloaded to your computer.
- An activated application, done by linking, in the Enable Banking
portal, every bank account you plan to use in Koinkat.
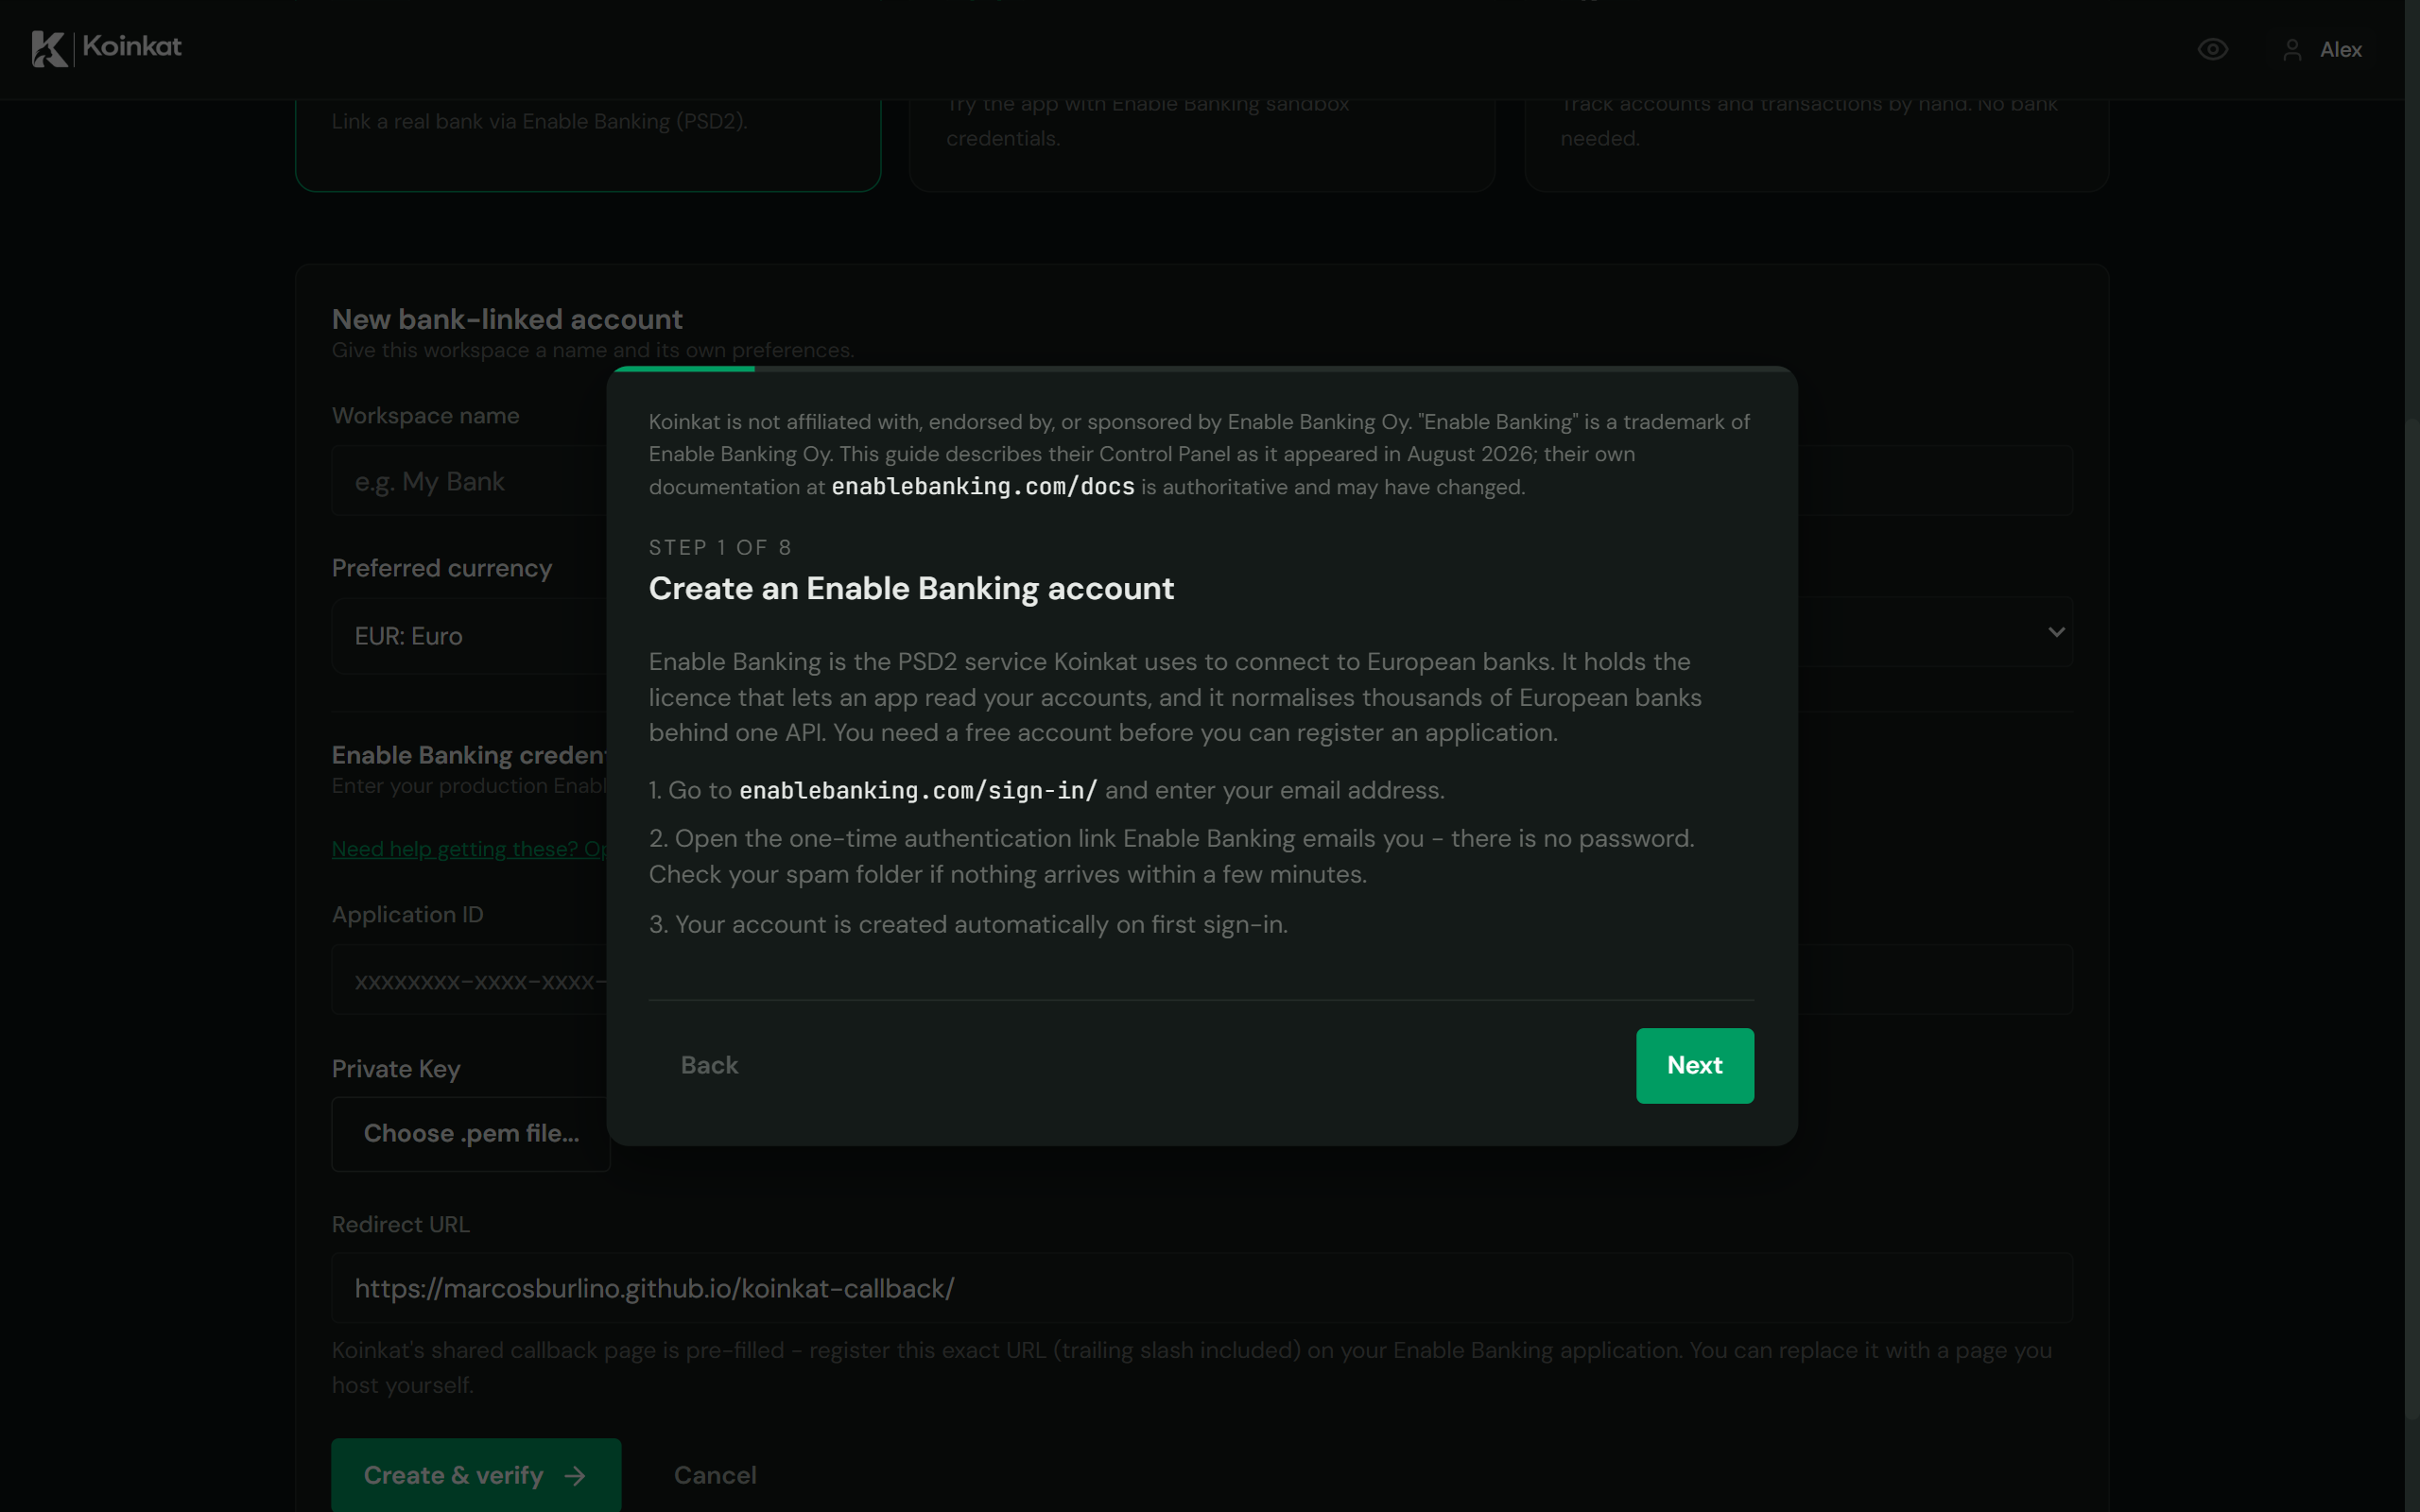
The same steps are also available inside the app: the workspace creation
form has a link named "Need help getting these? Open the setup
guide".
What Enable Banking is
Enable Banking is a regulated European
open-banking provider. Some background, because this is the part people
find most confusing.
PSD2 is the EU rule that obliges banks to let you grant a
third-party app read access to your own accounts, always with your
explicit consent given on the bank's own website. The specific
permission Koinkat uses is called AIS, for Account Information
Service: the right to read balances and transactions. There is a
separate permission for moving money, and Koinkat neither requests nor
implements it, so the app is incapable of initiating a payment or a
transfer even if someone wanted it to.
Why a provider in the middle? Every bank exposes a slightly
different PSD2 interface, and connecting to them directly requires a
regulatory licence and a bank-issued certificate. Enable Banking holds
that licence and normalizes its stated coverage of 2,700 banks across
30 European countries behind a single API. Koinkat talks to Enable
Banking; Enable Banking talks to your bank.
Why you register your own application rather than using one that
ships with Koinkat: credentials that could read bank data for any user
would be exactly the kind of secret that must never sit inside an app
distributed to the public. Instead each person holds their own, so
nothing about your bank access is shared with other Koinkat users or
with the project. The free tier covers personal use; see Step 6 for the
exact terms.
Consents expire. PSD2 caps them at just under 180 days, after which
you re-approve at your bank. That is the regulation, not a Koinkat
limitation, and every open-banking app works this way.
Step 1: create an Enable Banking account
- In your browser, go to
enablebanking.com/sign-in/.
- Enter your email address and submit.
- Enable Banking emails you a one-time sign-in link. Open your inbox
(check the spam folder if nothing arrives within a few minutes) and
click the link.
- That is the entire process: there is no password to invent, and your
account is created automatically the first time you sign in this
way.
Step 2: create an API application
An "application" here is simply the container for your credentials: its
ID plus your key are what identify Koinkat to the Enable Banking API.
Registration is a single form, and it also asks for the redirect URL and
the key, which Steps 3 and 4 cover. Read those two steps before you
submit the form, because everything is filled in one pass.
- After signing in you are in the Enable Banking Control Panel
(address:
enablebanking.com/cp/).
- In the top menu, open the API applications page, then start
registering a new application.
- Application name: anything you like; it is only a label.
Example:
Koinkat personal.
- "Choose Environment:" select Production. Production means
real banks and real data. (Sandbox is Enable Banking's test
environment: imitation banks with invented data. Sandbox credentials
cannot see real accounts, so pick it only if you want to try Koinkat
without connecting anything real.)
- "Choose Infrastructure:" most people never see this. It appears
only if dedicated infrastructure has been made available to your
account; if it is absent, there is nothing to decide, and if it is
present, leave the default.
- The remaining fields. A Sandbox application asks only for a name
and redirect URLs. A Production application also requires an
application description, a data protection email, a privacy policy
URL, and a terms of service URL. Two things worth knowing:
- The application description is not merely paperwork: Enable
Banking shows it to end users during the consent step, so it can
appear on the screen where you approve access at your own bank.
Write something you would be happy to read there, for example
"Personal finance tracking with Koinkat".
- The email and the two URLs exist for applications offered to the
general public. Nobody reviews them for an application you
activate in restricted mode with your own accounts (Step 6), but
the form still requires values before it will submit. Use your own
email address, and for the two URLs any real page you control is
fine; Koinkat's own
privacy policy
and license
are reasonable stand-ins for a personal setup.
- Do not press Register yet. Fill in the redirect URL (Step 3) and
choose how the key is handled (Step 4) first, then submit.
Step 3: set the redirect URL
The form asks for one or more redirect URLs. Enter exactly this
address:
https://marcosburlino.github.io/koinkat-callback/
Copy and paste it rather than typing it, and keep the final /. Here is
why this matters: when you later approve access on your bank's website,
the bank sends your browser to this address to deliver a one-time
authorization code back to Koinkat. Enable Banking only allows
redirects to addresses on this list, and it compares them character by
character - a missing slash counts as a different address and the
process stops with an error.
The page at that address is a single static file whose only job is to
hand the code to the Koinkat app on your computer. It does that by
opening a koinkat://auth-callback link, a "deep link" that your
operating system routes to the installed app; this is what produces the
"Open Koinkat?" prompt you will see in Step 8. The page stores
nothing, sends nothing anywhere, and its full source is public:
github.com/MarcoSburlino/koinkat-callback.
You have two options here and both are fine. The difference is whose
infrastructure the authorization code passes through on its way back to
you.
Koinkat's shared page - less setup. Use the address above; Koinkat
pre-fills it, so there is nothing else to do. Everyone can safely share
one callback page because it holds no secrets: the authorization code it
passes along is single-use, expires quickly, and is worthless without
your application ID and private key, which never leave your machine. It
is served from GitHub Pages, so GitHub records the request URL the way it
does for any page it hosts - see
How Koinkat handles your data.
Your own copy - the code touches nobody else's host. Host the page
yourself from the
public source,
register that address on your application instead, and paste it into the
Redirect URL field in Koinkat, which is editable. It is a single static
file, so any static host will do.
Step 4: generate and download your private key
Requests to Enable Banking are signed with an RSA key pair (RS256).
Enable Banking keeps the public half; you keep the private half and give
it to Koinkat. The form offers two ways to arrange that, and Koinkat
works with either.
The simple way, recommended: let the browser generate the key.
- On the same registration form, choose the option to let the browser
generate the private key for your application. The key is
created locally on your machine and is never transmitted to Enable
Banking; only the public half is registered.
- Submit the form with Register. Your browser downloads the
private key to your Downloads folder. It is named after the
application's ID, so it looks like
aaaaaaaa-bbbb-cccc-dddd-eeeeeeeeeeee.pem (yours will differ).
This download happens once and cannot be repeated: Enable Banking
never has your private key, so it cannot re-send it. Lose the file
and you must register a new application.
- This file is a private key: whoever has it, together with your
application ID, can request your bank data. Treat it like a spare
house key, calmly but seriously:
- Move it out of Downloads into a folder you will remember, for
example a
Koinkat folder inside your Documents.
- Never email it, never upload it anywhere, never put it in a
shared or synced public folder, and if you are a developer, never
commit it to a repository.
- Koinkat will ask for this file once, then keep the key in your
operating system's protected credential storage. Keep the file
anyway as a backup, for example for setting up a new computer.
The advanced way: supply your own public key. If you would rather
generate the key pair yourself and never have a private key travel
through a browser's download folder, choose the option to provide a
public key instead, and paste the contents of public.pem produced by
these two commands:
openssl genpkey -algorithm RSA -out private.pem -pkeyopt rsa_keygen_bits:2048
openssl rsa -in private.pem -pubout -out public.pem
private.pem stays on your machine and is the file you later hand to
Koinkat; public.pem is the one you paste into Enable Banking. The
in-app setup guide documents this route as well. Everything after this
step is identical, so if you are unsure, use the browser-generated key
above.
Step 5: note your application ID
After registration the Control Panel shows your application's page,
including its application ID: a long identifier of letters and
digits in five groups, like
aaaaaaaa-bbbb-cccc-dddd-eeeeeeeeeeee (yours will differ). Copy it or
keep the page open; Koinkat asks for it in Step 6. (It is also the
first part of your downloaded key's filename.)
Step 6: activate the application by linking your accounts
A newly registered Production application starts inactive, and
activation also fixes its scope: only the accounts you link here will
ever be visible to Koinkat. Link every account, at every bank, that you
plan to use. (A Sandbox application activates automatically, so if
you chose Sandbox in Step 2 you can skip straight to Step 7.)
- On your application's page in the Control Panel, click
Activate by linking accounts.
- Pick your bank and complete its login and consent screens, then
repeat for every bank whose accounts you want in Koinkat - only
linked accounts are ever returned to the app. This is the same kind
of bank-approval flow you will later use in Koinkat, and it happens
entirely on your bank's own website; the Control Panel linking is a
whitelist, not the connection itself, so you will still authorize
each bank again inside Koinkat. You can come back to the same page
to link more accounts later, and Enable Banking may cap how many
accounts one application can link.
- When it completes, your application is active in restricted mode,
for exactly the accounts you linked. Under Enable Banking's current
Terms of Service, no contract,
review, or payment is involved, and the terms expressly permit
personal use by private individuals; commercial activation is for
companies offering their application to other people.
This covers your own personal accounts only - not business accounts,
not anyone else's, and no commercial use. Each person using Koinkat
needs their own Enable Banking account and application.
Step 7: enter the credentials in Koinkat
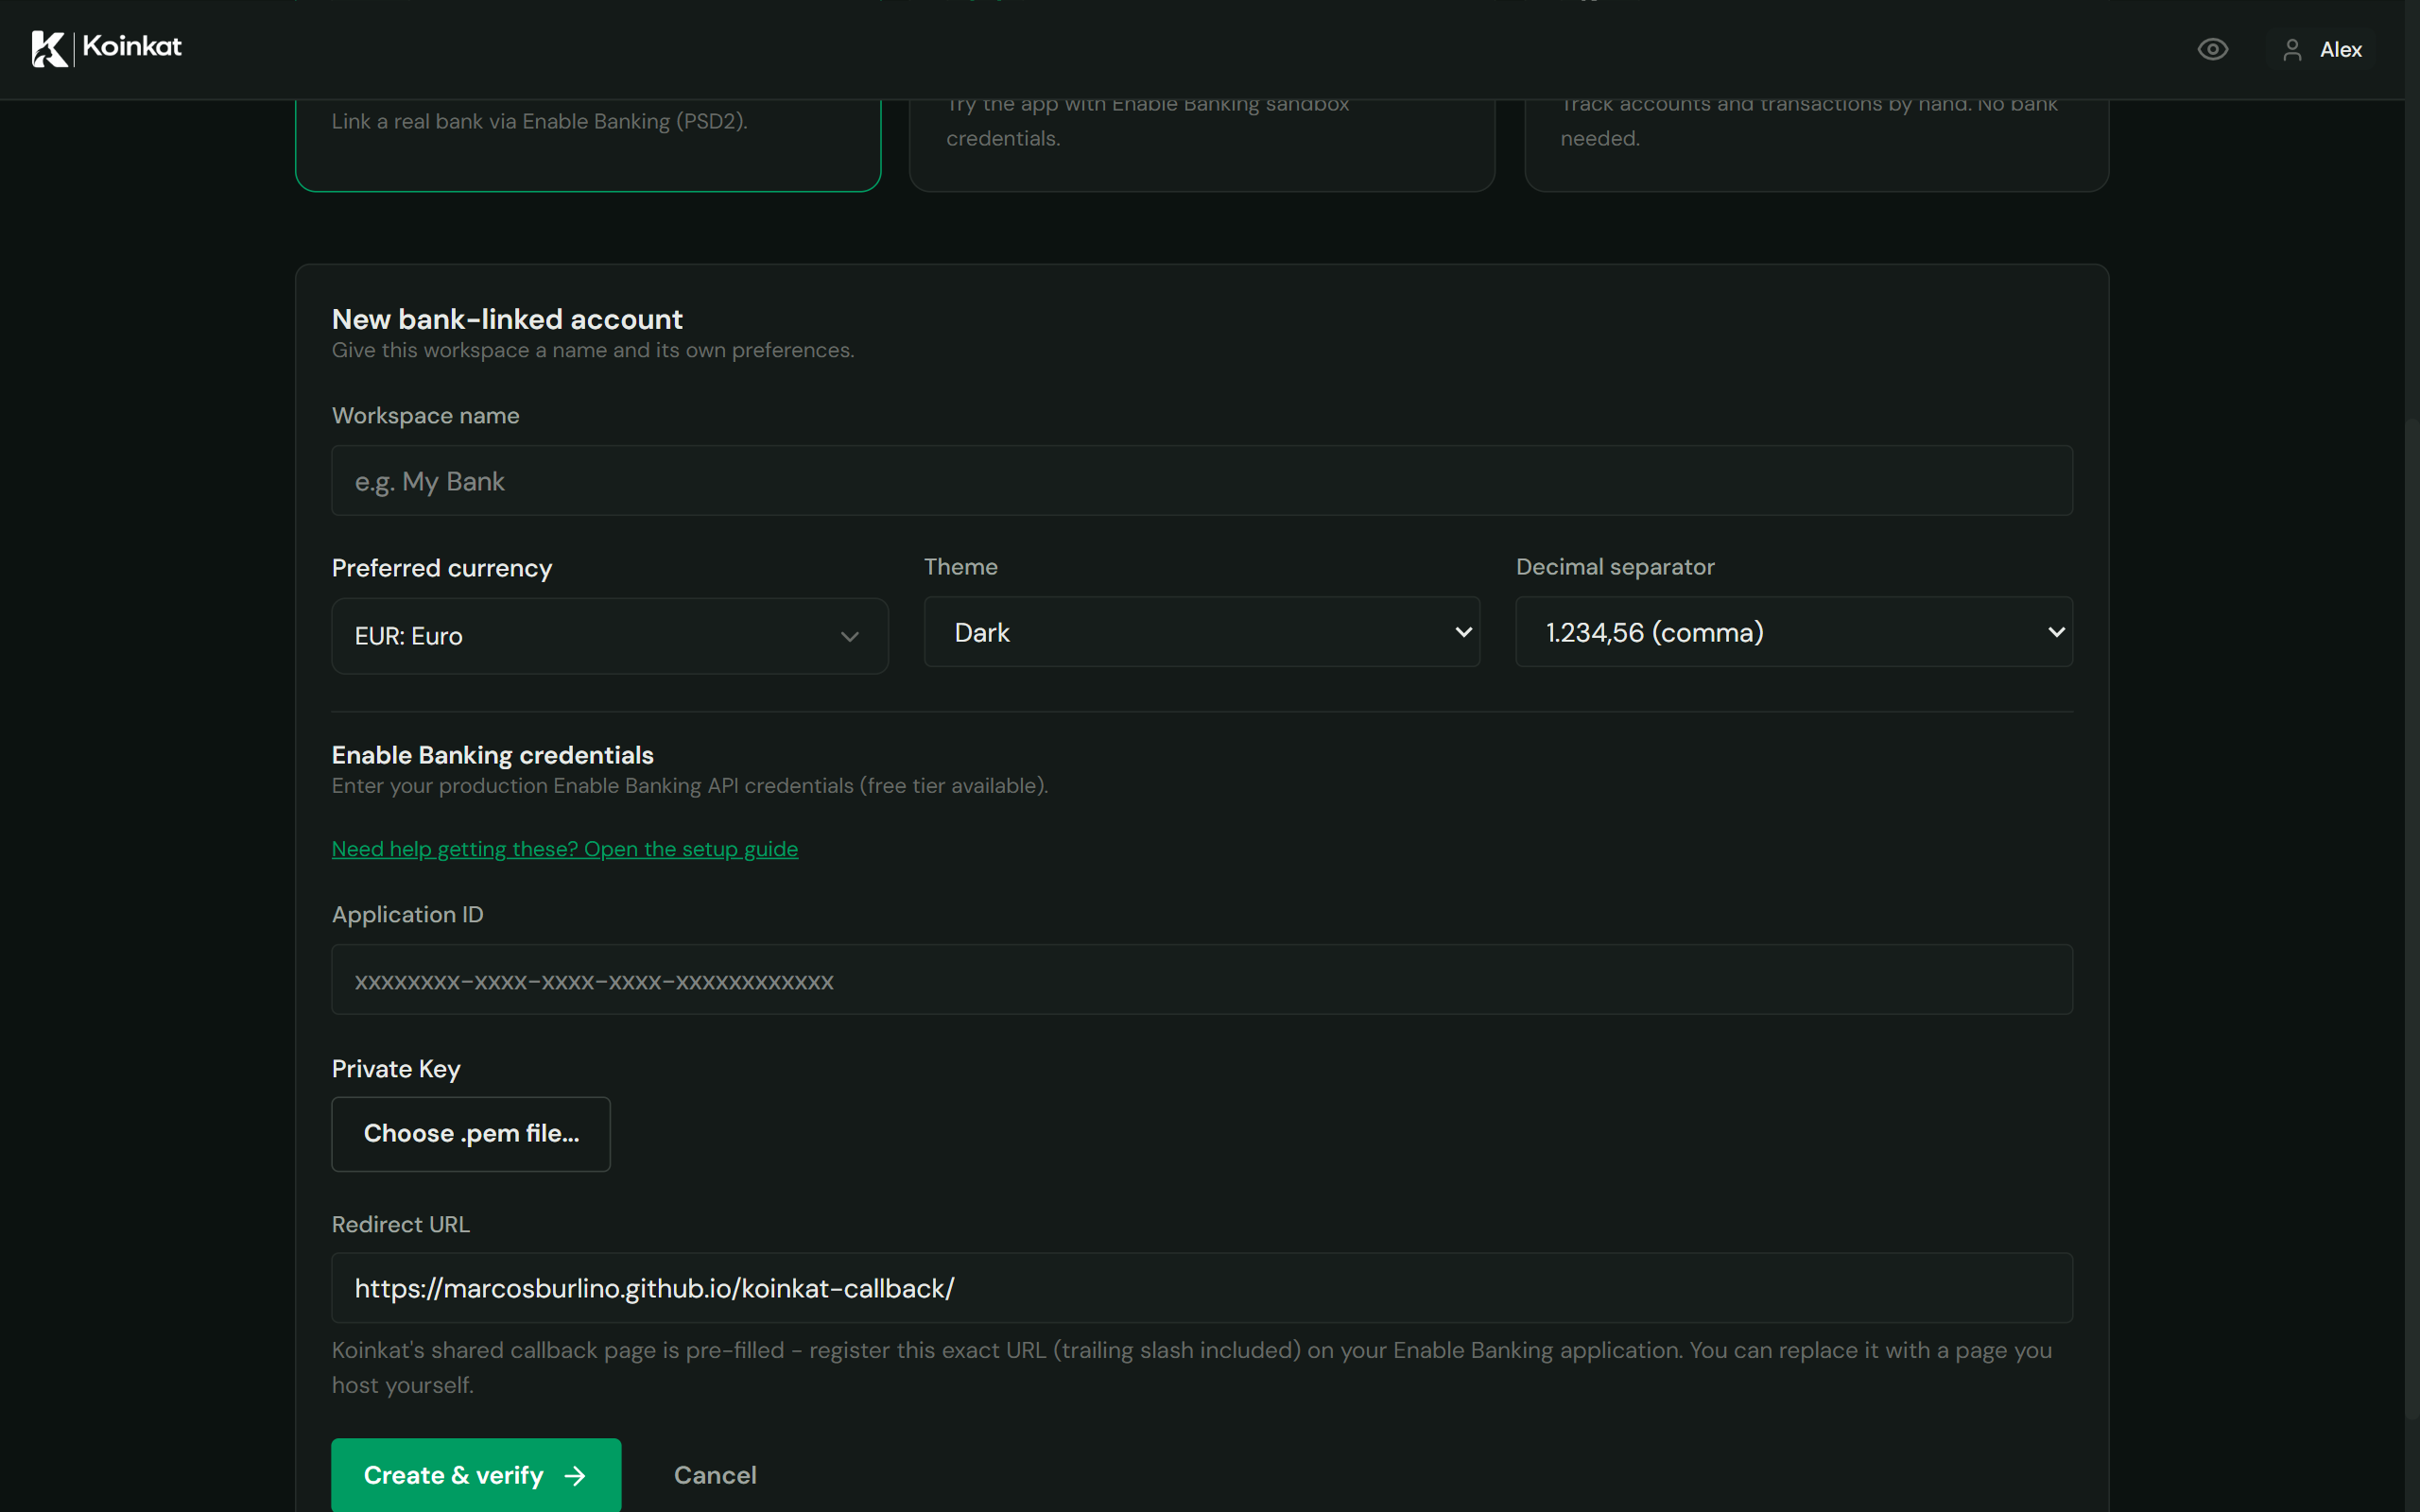
Now switch to the Koinkat app:
- In the workspace hub, choose the Connect a bank card.
- Give the workspace a name and pick your preferred currency, decimal
separator, and theme, as with any workspace.
- The credentials section carries a link reading "Need help getting
these? Open the setup guide", which opens the same eight steps
inside the app if you want them side by side with the fields.
- In the Application ID field, paste the ID from Step 5. The field
shows the expected shape as a placeholder
(
xxxxxxxx-xxxx-xxxx-xxxx-xxxxxxxxxxxx), so a stray space or a
half-copied value is easy to spot.
- Under Private Key, click Choose .pem file... and, in the
file dialog, navigate to where you moved your key in Step 4 (for
example Documents > Koinkat) and select the
.pem file. The chosen
filename then appears next to the button, which is your confirmation
that the right file was picked. Koinkat reads the whole file, so it
must still contain its delimiter lines,
-----BEGIN PRIVATE KEY----- and -----END PRIVATE KEY-----. If
you ever opened the key in an editor and saved only the middle
portion, it will be rejected.
- The Redirect URL field is already filled in with the same
callback address you registered in Step 3:
https://marcosburlino.github.io/koinkat-callback/
Leave it as it is. (Only change it if you registered a
self-hosted page instead. The field only accepts an address starting
with https://, because Enable Banking rejects anything else.)
7. Click Create & verify. This is not a blind save: Koinkat
immediately signs a real request to the Enable Banking API with your
key, so a typo in the ID, the wrong .pem, or an application that
is not activated yet is caught here rather than later. If you get an
error, see Troubleshooting.
8. On success the workspace is created, your key moves into the
operating system's credential store (Windows Credential Manager,
macOS Keychain, or the Linux secret service) rather than staying in
the database, and the app takes you straight to the bank-linking
screen.
If you would rather add credentials to a workspace that already exists,
the same three fields live in Settings > Bank credentials, where the
file button reads Replace .pem file... instead.
Step 8: link your bank
The screen is headed "Select your country and bank to connect via open
banking."
-
First choose how much history to import. The options are Last 30
days, Last 90 days, Maximum history (180 days), which is
the recommended default, or everything from a date you pick. This
choice matters more than it looks: 180 days is the furthest back
PSD2 lets a bank go, so history older than your chosen window will
not appear in Koinkat. If you are unsure, take the maximum. You can
also import less now and pull older history later from Settings.
-
Pick your country from the Country dropdown. The bank list
reloads for that country each time you change it.
-
Find your bank. The Search banks box (placeholder "Type to
filter...") narrows a long list quickly. Click Connect next to
your bank; the button changes to Connecting... while Koinkat
opens the session.
-
Your regular web browser opens on your bank's authorization page,
and Koinkat switches to a screen headed Complete authorization
that walks through the two remaining steps. Log in on your bank's
own website - Koinkat never sees these credentials, and cannot -
then approve read access to the accounts you want. Most banks
confirm with a second factor, such as an app confirmation or an SMS
code.
-
After you approve, the bank sends your browser to the callback page,
which immediately tries to hand the authorization code to the app.
Your browser asks something along the lines of "Open Koinkat?".
Click Allow or Open, and Koinkat finishes the connection by
itself.
-
If no prompt appears, or you dismissed it, nothing has gone
wrong. The callback page also shows the code with a Copy Code
button. Click it, return to Koinkat, paste the code into the field
labeled "Paste authorization code here...", and click Connect &
Sync. This path is fully supported and ends in exactly the same
place as the automatic one; some browsers simply refuse to hand off
to a desktop app without being asked.
-
Koinkat now shows Syncing... ("Creating accounts and importing
transactions..."). Behind that screen it exchanges the code for
access, creates one account in the app per bank account you
approved, imports the history window you chose, and runs its
categorization engine over the results. On a long window this can
take a minute or two.
-
Success looks like a screen headed Connected! with a summary
of what was imported, offering Go to Dashboard and Link
another bank. Your accounts appear with balances on the Dashboard,
and the imported transactions are waiting in the Review inbox to
be categorized rather than sitting directly in Transactions.
Repeat the whole step for each additional bank, using Link another
bank. Every bank is a separate consent, so a second bank means a
second trip through its own login and approval screens.
Consent expiry
Bank consents under PSD2 are time-limited: Koinkat requests the maximum
the regulation allows, just under 180 days. When a consent expires, that
bank stops syncing and Settings flags the connection - renew it by
linking the bank again from the Bank Link screen (the same Step 8).
Relinking recognizes the same underlying accounts, so your history and
categorizations are preserved.
You can revoke a bank consent at any time without waiting for it to
expire, in three places: disconnect the bank inside Koinkat, terminate
the consent at , or
withdraw it from your bank's own consent or third-party-access dashboard.
Revoking at your bank is the one that always works, because it does not
depend on any other service being reachable.
Troubleshooting
I downloaded the installer but cannot find it. Browsers save to the
Downloads folder by default. Windows: File Explorer > Downloads, or
press Ctrl+J in the browser to see its download list. macOS: the
Downloads stack in the Dock, or Finder > Downloads. Linux: the Downloads
folder in your file manager.
Build fails on Windows with link.exe not found or a C++ toolchain
error. The Microsoft C++ Build Tools (or its "Desktop development with
C++" workload) are missing - install them, reopen the terminal, retry.
Build fails on Linux with pkg-config / webkit2gtk / soup
errors. A system library from the apt list above is missing - rerun
that install command, then rebuild.
node, npm, rustc, or git is "not recognized". Either not
installed, or the terminal was open during installation - close and
reopen it. Verify with the version commands above; Node must be v22.x
(older versions fail the build).
Windows SmartScreen blocks the installer. Expected for unsigned
Windows builds - the exact clicks are in
Path A, and the background is
explained there under "Why the Windows installer shows a security
warning". Installing with winget install MarcoSburlino.Koinkat
instead shows no warning at all.
macOS builds are signed and notarized from 0.1.1 onward, so Gatekeeper
does not block them; if you see a "damaged" message you are running
0.1.0 or earlier and should update.
Bank linking fails immediately with a redirect URL error
(REDIRECT_URI_NOT_ALLOWED). The redirect URL in Koinkat does not
exactly match a URL registered on your Enable Banking application -
including the trailing slash. Fix the application's redirect URL list in
the Control Panel (or the field in Koinkat Settings) so both are exactly
https://marcosburlino.github.io/koinkat-callback/.
Credential verification fails when creating the workspace.
"Doesn't look like a valid private key" means the selected file is not
the private .pem you downloaded. A 401 or 403 error from Enable
Banking means the application ID and key do not match, or the
application is not activated yet - re-check the ID, that you picked the
right .pem, and the application's activation status in the Control
Panel (see Step 6).
The "Open Koinkat?" prompt never appears. Some browsers suppress
custom-protocol prompts. Use the copy-paste path on the callback page -
it is fully supported, not a degraded mode. If Koinkat is freshly
installed and the prompt is never offered at all, launch Koinkat once
and retry (the app registers its koinkat:// link handler at startup).
The Windows installer fails while fetching WebView2. The installer
downloads Microsoft's WebView2 runtime only when it is missing - it is
preinstalled on Windows 10 (April 2018 update and later) and Windows
11, so this only happens on older or offline systems. Connect to the
internet and rerun the installer, or install the "WebView2 Runtime"
manually from Microsoft's site first.
Bank linked successfully, but no accounts appeared. In restricted
mode Enable Banking returns only the accounts previously linked to your
application in the Control Panel; authorizing an account that was not
linked yields an empty list. Open your application in the Control
Panel, link that bank's accounts via Activate by linking accounts,
then link the bank again in Koinkat.
Connected, but no transactions. First check the Review inbox -
imports land there for categorization, not directly in Transactions.
Then check the import window you chose (a 30-day window on a quiet
account may genuinely be empty). Some banks also reject the
pending-transactions filter; Koinkat then imports booked transactions
only and notes it - pending ones appear once booked.
Sync fails with a rate-limit message. PSD2 allows roughly four
unattended data pulls per account per day; Koinkat's normal sync uses
three of them. If you hit the limit, the next day's sync proceeds
normally.
Settings says the key is stored in the database, not the keychain.
No OS credential store was reachable (common on minimal Linux setups:
install and unlock GNOME Keyring or KWallet, then re-save the
credentials in Settings). The app keeps working either way; the
keychain is simply the safer location.
Koinkat offers to restore a backup. It does that whenever it opens to
a database with no users while its automatic backups exist - for example
after the database file was replaced or emptied. Restoring never deletes
anything: the current database is renamed and kept beside it, the backup
is copied in, and the app asks you to close and reopen it so the restored
data is brought up to date. Koinkat found your data, but not who it
belongs to means the workspaces are all there but their user record is
missing; Recover my data puts it back.
Koinkat opens on "could not open your data" or "found no users in its
database". The first means reading the database failed; press Retry,
and if it keeps happening, close the app and back up the database file
the screen names before anything else. The second means the database
opened but is empty on a computer where Koinkat was set up before -
usually because the data folder was deleted, or because the app is
reading a different database file than usual. If you deleted it on
purpose, choose Start fresh. If you did
not, do not set anything up: check the file path shown, and restore
your backup over it with the app closed.
Koinkat says "Your data needs a newer version of Koinkat". A newer
version has already opened and updated your database, and the copy you
are running is older. Your data is intact. Install the latest release
(or winget upgrade MarcoSburlino.Koinkat) and it opens as before.
Releases up to 0.1.4 report this as "could not open your data" with a
message containing "was previously applied but is missing in the
resolved migrations" - the cause and the fix are the same.
Net worth shows "could not reconcile" or missing conversions. The
daily exchange-rate fetch failed (offline, or the CDN was unreachable).
The Dashboard offers a refresh; rates are cached per day once fetched.
Uninstalling
Removing the app itself:
- Windows: Settings > Apps > Installed apps > Koinkat > Uninstall.
- macOS: drag
/Applications/Koinkat.app to the Trash.
- Linux: remove the package with your package manager
(
sudo apt remove koinkat on Debian/Ubuntu); for the AppImage,
simply delete the file.
Uninstalling does not touch your data, so a reinstall finds everything
as you left it. To remove the data as well, delete both folders below,
plus the credential-store entries if you linked a bank. On Windows,
ticking Delete the application data in the uninstaller removes both
folders for you.
- Your data - the database holding every workspace, account, and
transaction, with its automatic backups in the
backups folder inside:
- Windows:
C:\Users\\AppData\Roaming\com.koinkat.app
- macOS:
~/Library/Application Support/com.koinkat.app
- Linux:
~/.config/com.koinkat.app
- The app's browser storage - no financial data, but it remembers
that Koinkat has been set up on this computer, along with small
preferences such as privacy mode:
- Windows:
C:\Users\\AppData\Local\com.koinkat.app
- macOS:
~/Library/WebKit/com.koinkat.app
- Linux:
~/.local/share/com.koinkat.app
- Enable Banking keys (present only if you linked a bank) are
stored in the operating system's credential store under the service
name
koinkat, one entry per workspace named eb-pem-:
- Windows: Credential Manager > Windows Credentials - remove the
entries containing
koinkat.
- macOS: Keychain Access - search for
koinkat and delete the
entries.
- Linux: your keyring tool (for example GNOME's Passwords and Keys) -
search for
koinkat.
Deleting a workspace inside the app performs the same cleanup for that
workspace, including its credential-store entry, so removing all
workspaces before uninstalling leaves no bank keys behind.
To start over without uninstalling, the simplest route is inside the
app: Settings > Leave this workspace, then Switch user on the
workspace hub, then the delete icon next to your name on the "Who's
using Koinkat?" screen. The next launch opens on first-run setup, which
offers Koinkat's automatic backups first; ignore that offer to start
empty. If you delete only the
data folder instead, the next launch reports that Koinkat "found no
users in its database" - that is the app refusing to mistake missing
data for a brand-new install. If you removed the data on purpose, choose
Start fresh on that screen.
Build modes
Three modes, each producing a verifiably different bundle:
| Mode | Command | Mocks | /rules route | Sandbox card | Tauri ID |
|---|
| Development | npm run tauri:dev | on | visible | visible | com.koinkat.app |
| Demo | npm run tauri:build:demo | on | hidden | visible | com.koinkat.app.demo |
| Production | npm run tauri:build | build fails if leaked | removed | hidden | com.koinkat.app |
Demo installs side-by-side with production (different identifier). See
docs/development.md for the full setup and the
three-layer defense that keeps mocks out of production binaries.
Stack
Tauri 2 (Rust shell) · React 19 + TypeScript 5.7 · Vite 6 · Tailwind CSS 4
· SQLite via tauri-plugin-sql · Zustand 5 · Recharts 2 · big.js for
all money math · jose for Enable Banking RS256 JWTs.
Security model
Koinkat is local-first; the trust boundary is your machine. The full
privacy policy is in docs/privacy-policy.md.
- All data is stored locally in a SQLite database under your OS
app-config directory. The database is not encrypted at rest - rely
on OS disk encryption (BitLocker / FileVault / LUKS) if you need it.
Anyone with access to your OS user account can read your financial data.
- Your Enable Banking private key is stored in the operating system's
credential store (Windows Credential Manager, macOS Keychain, Linux
secret service), not in the database. If no credential store is
available, Koinkat falls back to the local database and says so in
Settings.
- Exports: the JSON export deliberately excludes API credentials. The
raw-database export is a full backup - treat the file like the database
itself. The automatic backups are the same kind of file and stay in the
app's own data folder on this device; nothing is uploaded anywhere.
- Network: the content-security policy allows data connections only
to
api.enablebanking.com and the exchange-rate CDN
(cdn.jsdelivr.net, *.currency-api.pages.dev). Typefaces are
bundled with the app, so no font host is contacted. The complete
outbound inventory is in
How Koinkat handles your data.
There is no telemetry endpoint to allow.
- OAuth: the bank-link deep-link callback validates a cryptographically
random state; missing or mismatching states are rejected.
- Release binaries are built without the webview devtools feature.
Found a vulnerability? See SECURITY.md.
Repository layout
Koinkat/
├── src/                    Frontend (React + TypeScript)
│   ├── pages/              Route components
│   ├── components/         UI components + layout
│   ├── services/           Business logic; the only layer that talks to the DB
│   ├── stores/             Zustand stores
│   ├── domain/             Pure helpers (money math, merchant normalization)
│   ├── lib/                Cross-cutting utilities
│   ├── types/              TypeScript types + row→model mappers
│   ├── db/                 SQL schema + incremental migrations (v2 → v15)
│   ├── data/               Static data (MCC mappings)
│   └── mocks/              Fixture-backed Enable Banking stub (dev/demo only)
├── src-tauri/              Tauri Rust shell + config
├── docs/                   Public documentation (architecture, dev guide, audit)
└── .agent/                 AI agent knowledge base (gitignored, local-only)
Documentation
docs/architecture.md - system layers, services,
cross-cutting patterns, build flags, Tauri host.docs/development.md - running, building,
three-build-mode setup, migrations recipe, conventions.docs/restructure-audit.md - historical
audit of the pre-publication restructure (2026-04-24) and follow-up.- Code signing policy - how release
artifacts are signed, team roles, and the privacy policy.
Don't see what you're looking for? Open an issue.
Contributing
See CONTRIBUTING.md for setup, the project invariants
(money math, workspace isolation, mock containment), and the PR
checklist. Community expectations live in
CODE_OF_CONDUCT.md; release history in
CHANGELOG.md.
License
Koinkat is free software: you can redistribute it and/or modify it under
the terms of the GNU General Public License as published by the Free
Software Foundation, either version 3 of the License, or (at your option)
any later version (GPL-3.0-or-later).
Copyright (C) 2026 Marco Sburlino
See LICENSE for the full text. Licences for the third-party
code and typefaces bundled with the app are in
THIRD-PARTY-LICENSES.md, which also ships
inside the installer.
No warranty, and not financial advice
Koinkat is provided as-is. Sections 15 and 16 of the GPL-3.0 disclaim all
warranty and limit liability - please read them; they are short and they
mean what they say.
Two things follow that are worth stating plainly:
- Check your own numbers. Koinkat reads data from your bank through a
third party and does arithmetic on it. Bugs, failed syncs, stale exchange
rates and bank-side quirks are all possible. Your bank's own statements
are the authoritative record, not this app.
- Nothing here is financial advice. Koinkat shows you your money. It
does not advise you about it, and no output of this app is a
recommendation to do anything.