lsmd
A terminal-friendly Markdown (.md) reader built for speed and easy navigation in large projects.
lsmd shows every Markdown file in your project on one screen, so you can browse and read them quickly. It knows which documents link to each other, in both directions, so you can jump to related documents instantly. It searches the document you're reading as you type, and every file in the project in a moment. It makes it easy to find your way around everything your team and your AI agents write.
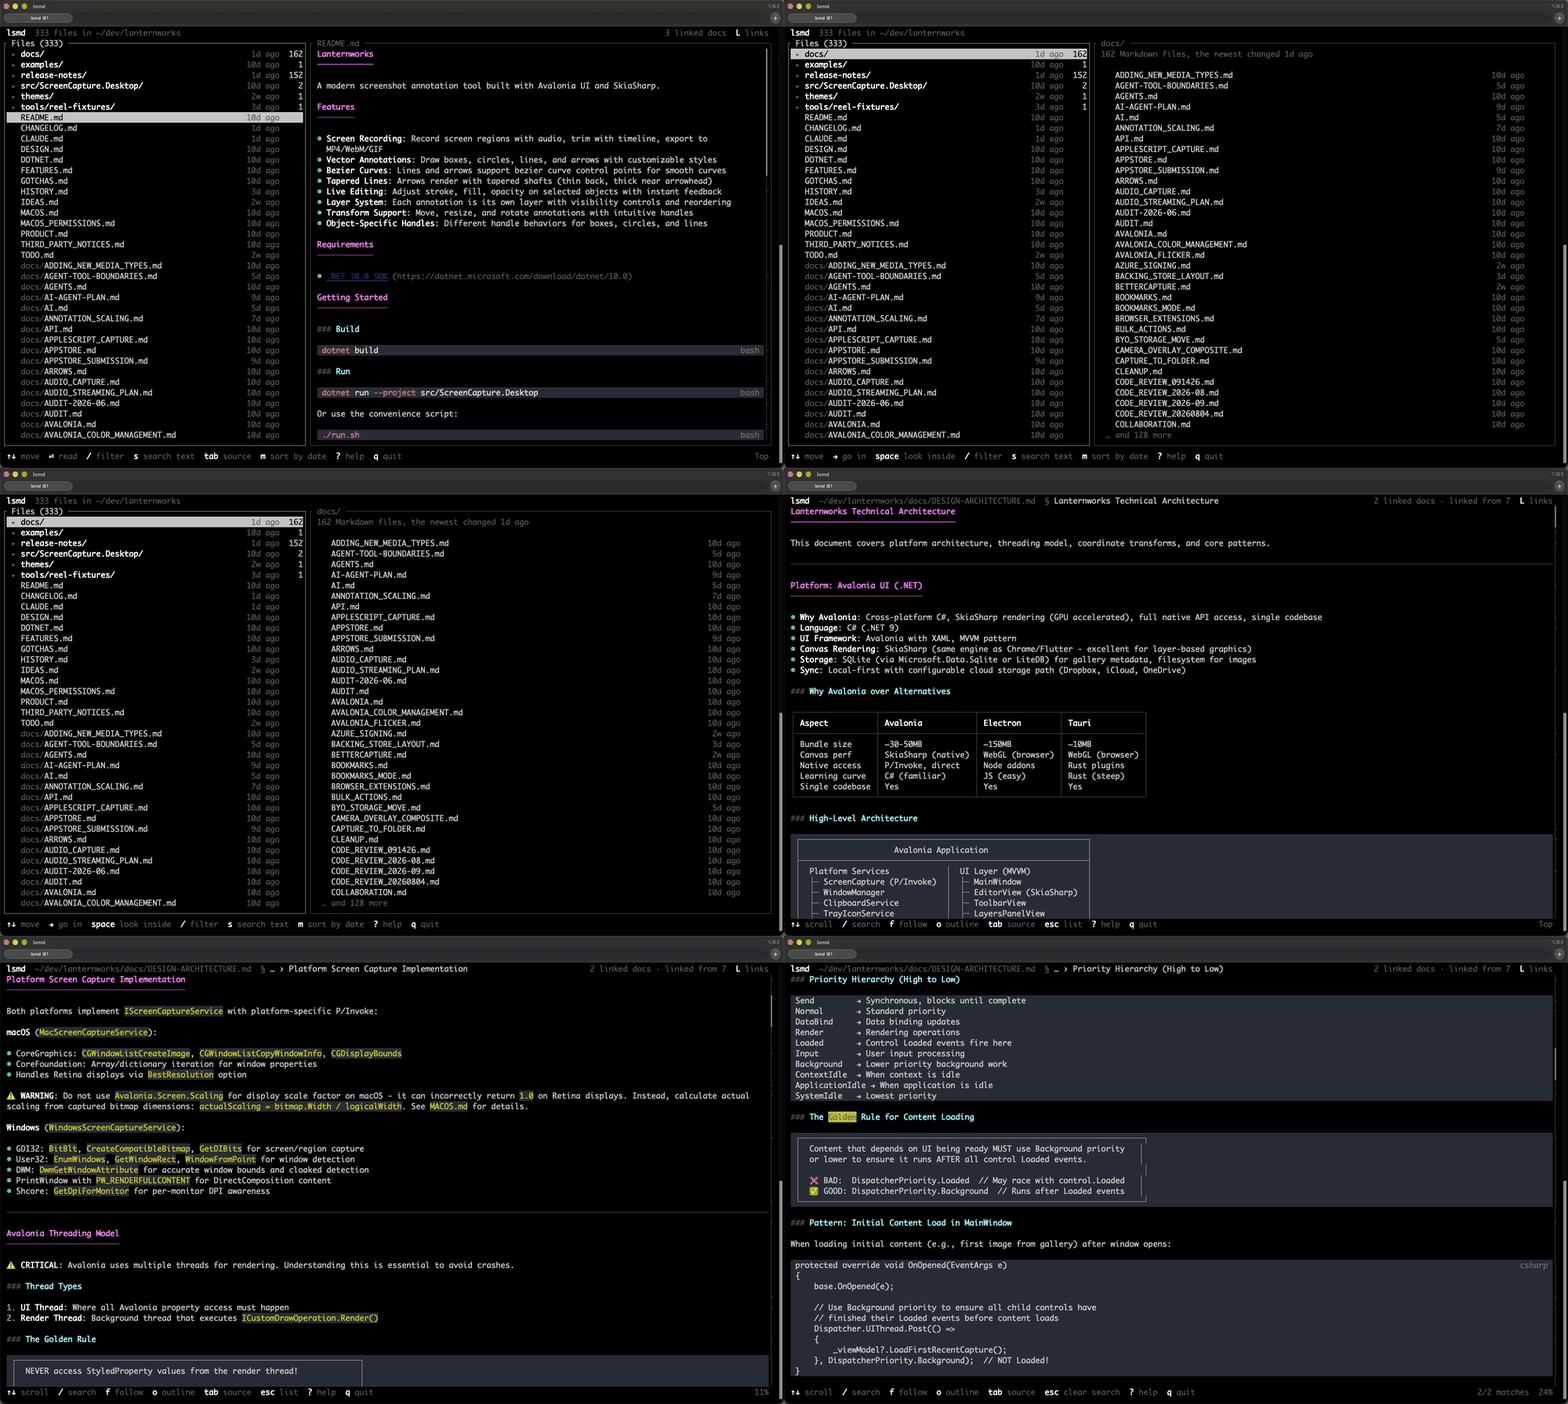
That's lsmd in a project with 333 Markdown files. The folders come first, each with how many files are in it, then every file, with how long ago it changed; holding ↓ renders each one beside the list as fast as your keyboard repeats. A folder shows what's in it, → goes in and ← comes back out. /design-arch narrows the list to one file and Enter opens it. o brings up its outline, where the text follows each heading as you move through them. Then /golden searches the document, and n goes to the next match.
Why
Documentation piles up. A project that's been worked on for a while, especially with AI agents writing plans and design notes, ends up with hundreds of Markdown files that refer to each other. Reading them one at a time in an editor or a pager loses the thread. lsmd is built for following it.
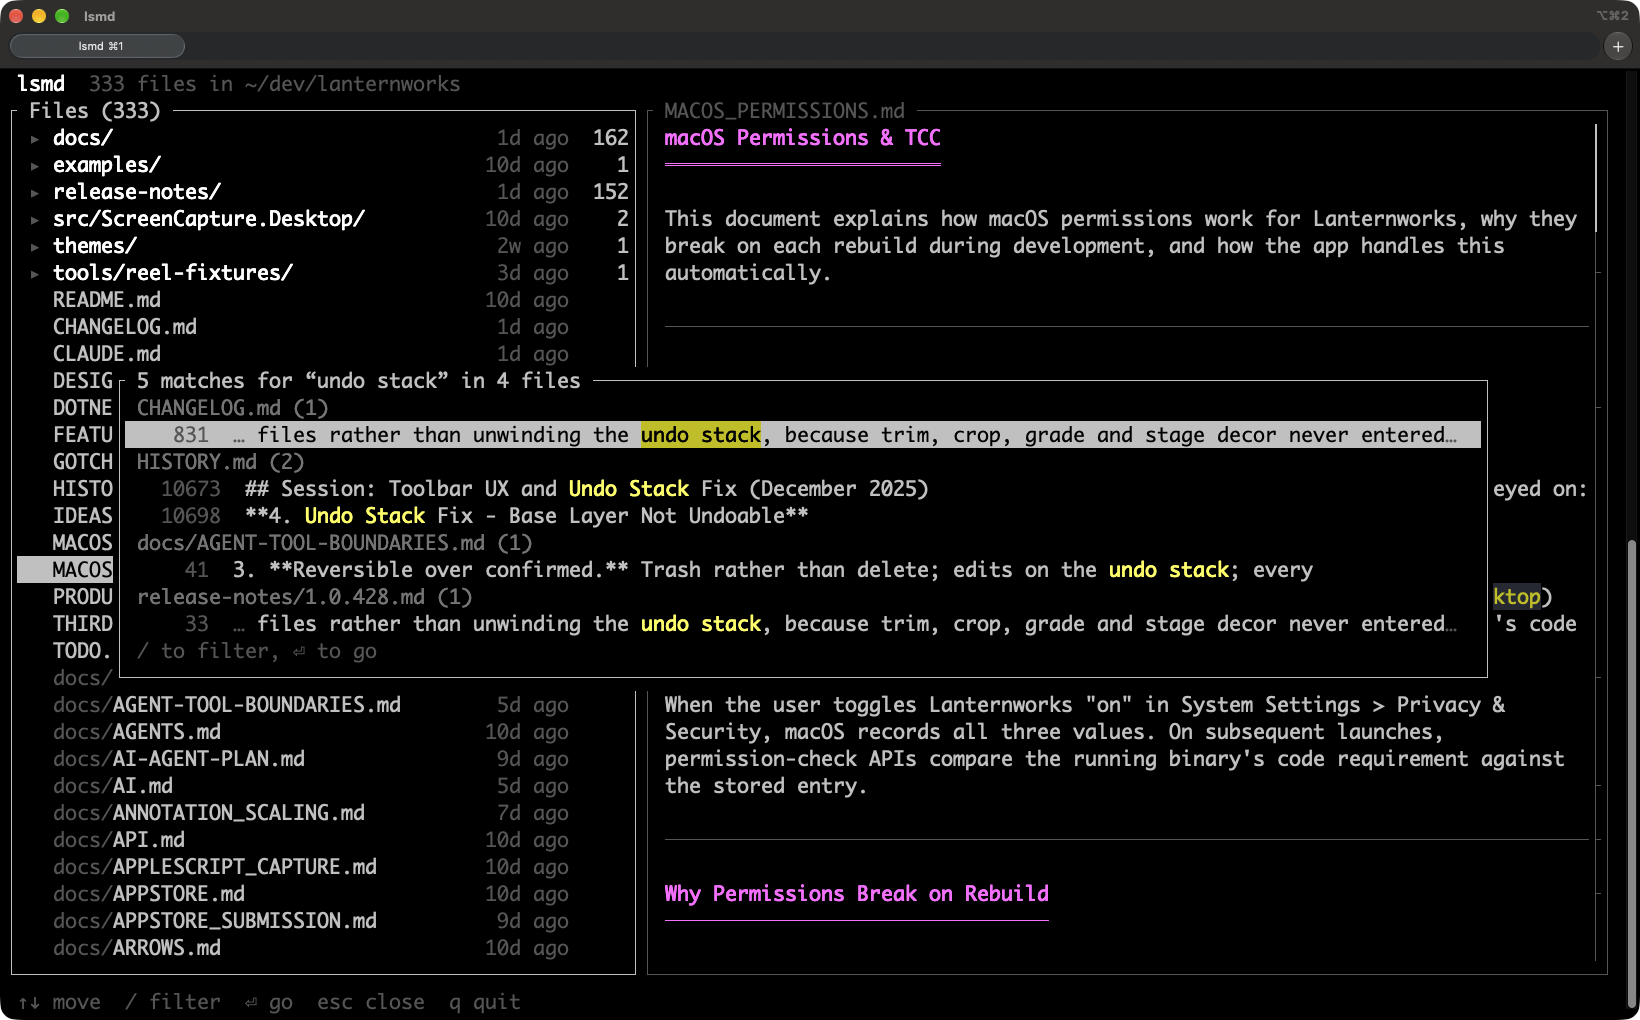
Search every file. / narrows the list by name as you type, and a moment after you stop, the files with it in their text follow, most matches first; the preview shows each one's first match. s lists every matching line in every file instead, grouped by file. Either way, opening a file lands on the match, highlighted, with n and N for the next ones.
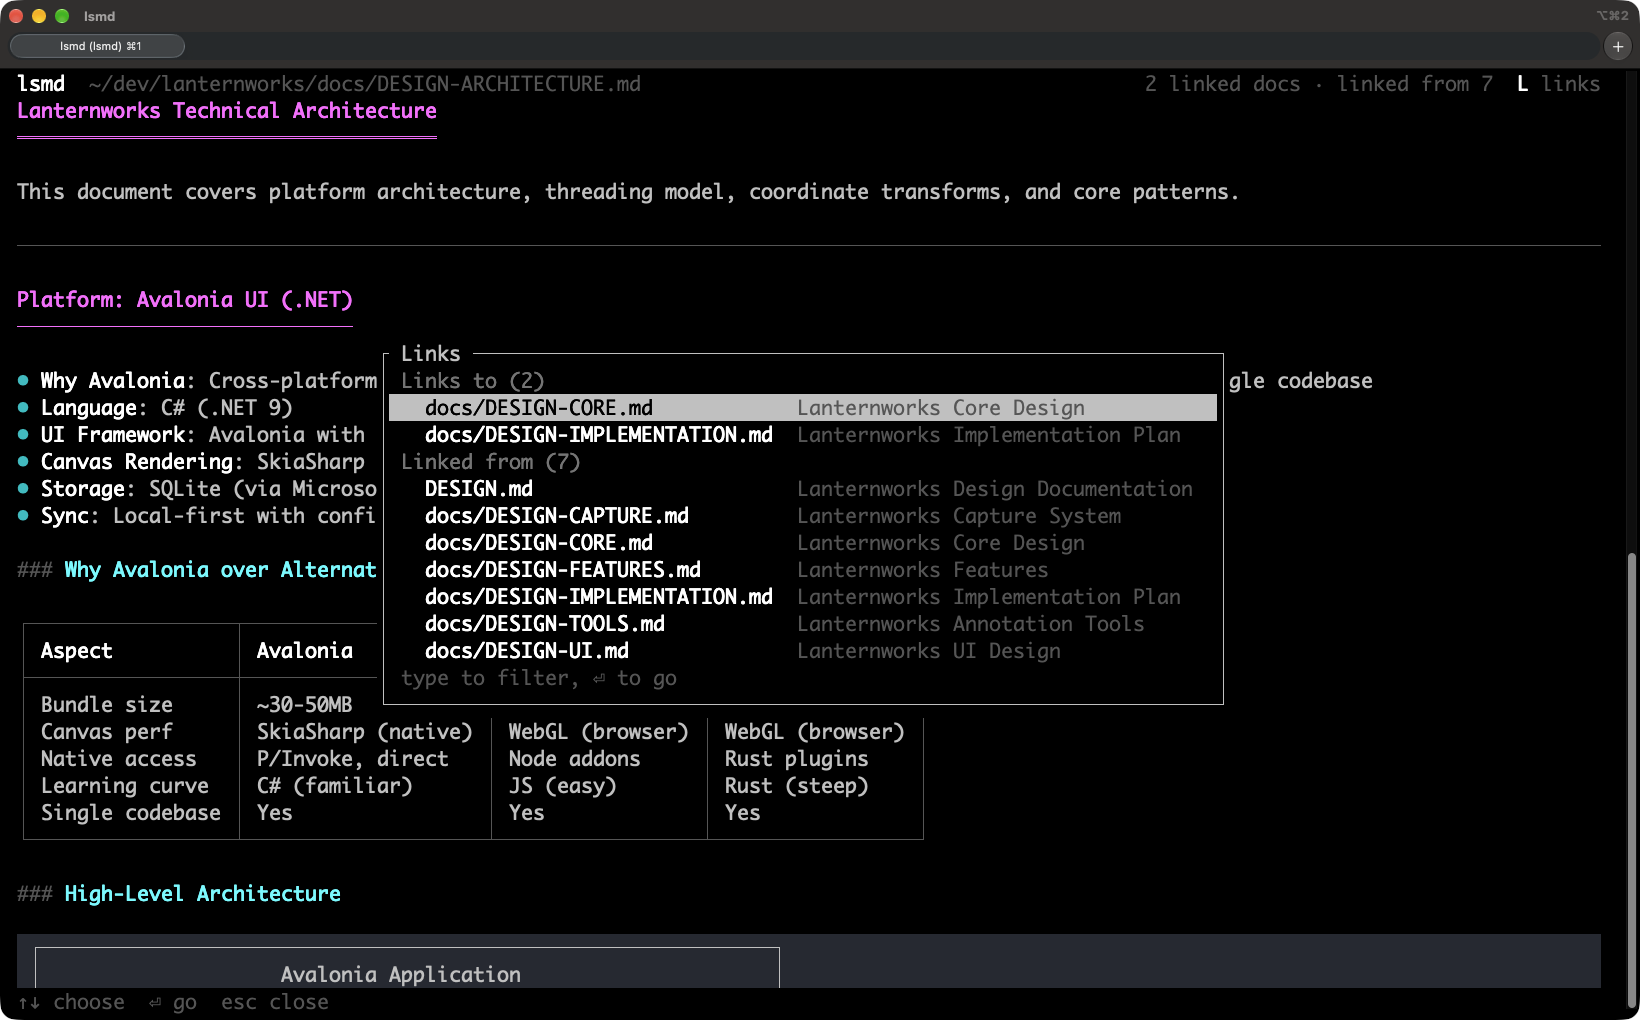
See how documents connect. The header shows how the document on screen is connected: 2 linked docs · linked from 7. L lists both directions, with each document's title. "Linked from" answers the question you usually have in a pile of docs: what else refers to this? Links to files that don't exist are struck through.
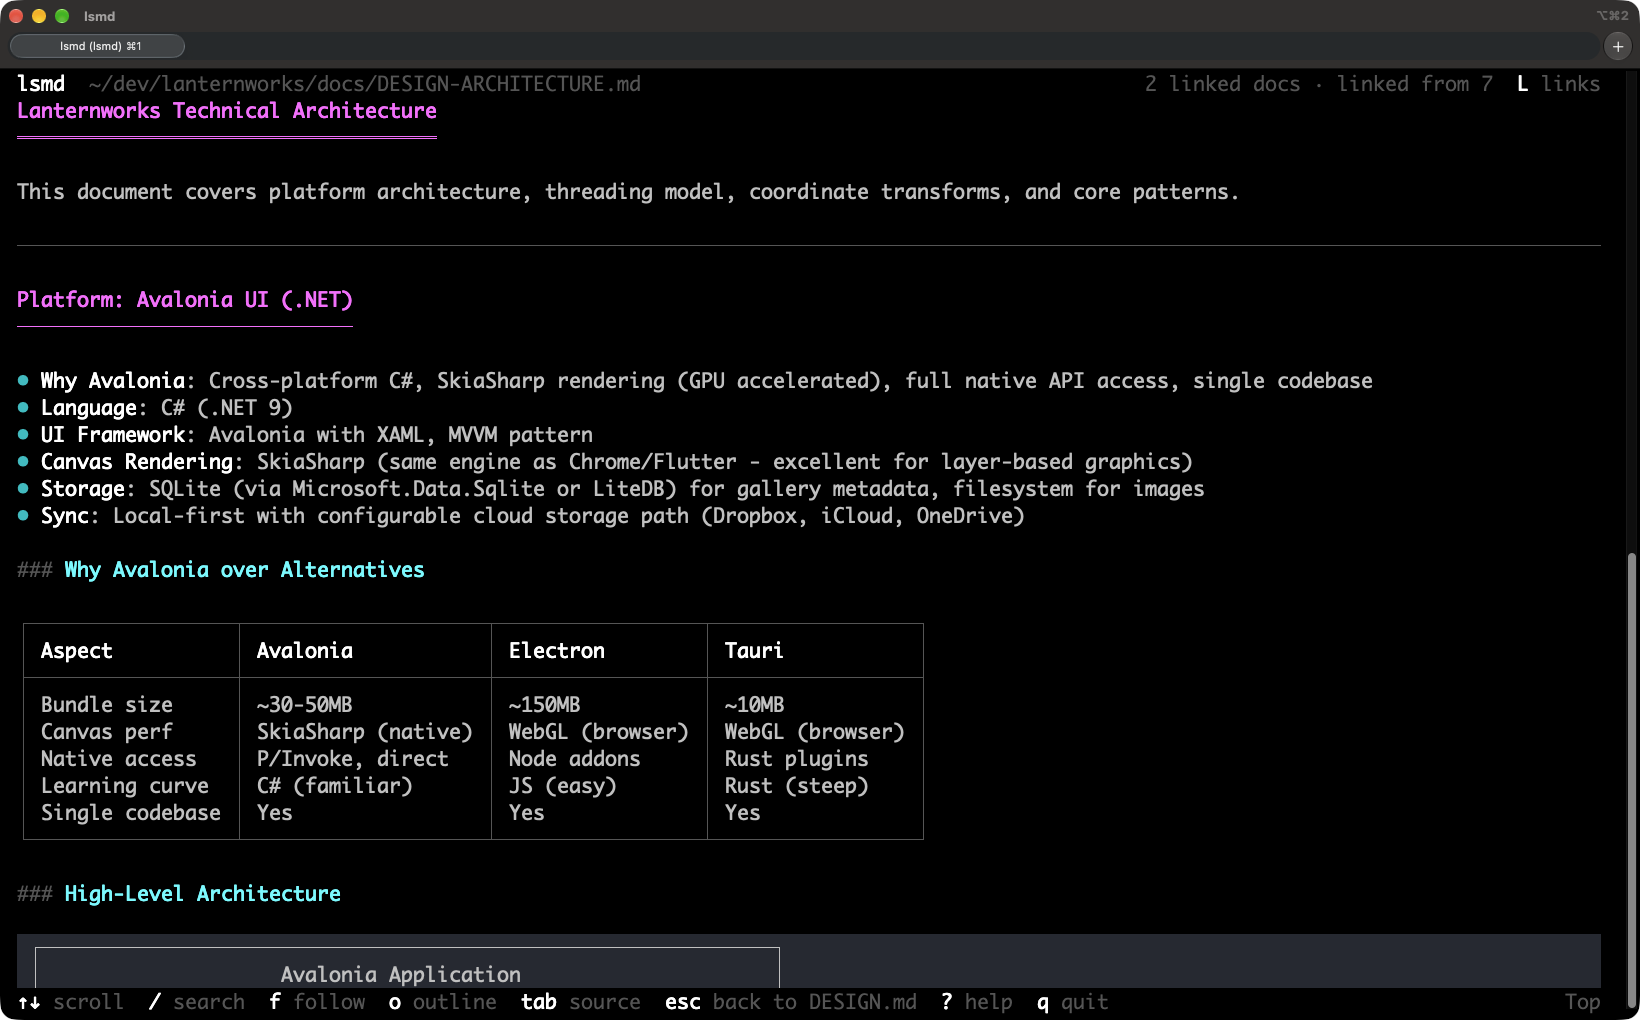
Chase links, then come back. Follow a link from the links panel, by clicking it, or with f, which puts a letter on every link on screen for you to type. Keep going as deep as you like. Esc (or ←) goes back one document at a time, each scrolled to where you were, and the footer says where it'll take you. When there's nowhere left to go back to, it takes you to the file list.
Find your place in a long document. The header always shows which section you're in (§ Install › On Windows), and a scrollbar shows where you are; click or drag it to jump. / searches the document, ] and [ jump between headings, o opens the outline, where the text follows along as you move through the headings (/ filters them), and O keeps the outline open beside the text, highlighting the section you're reading.
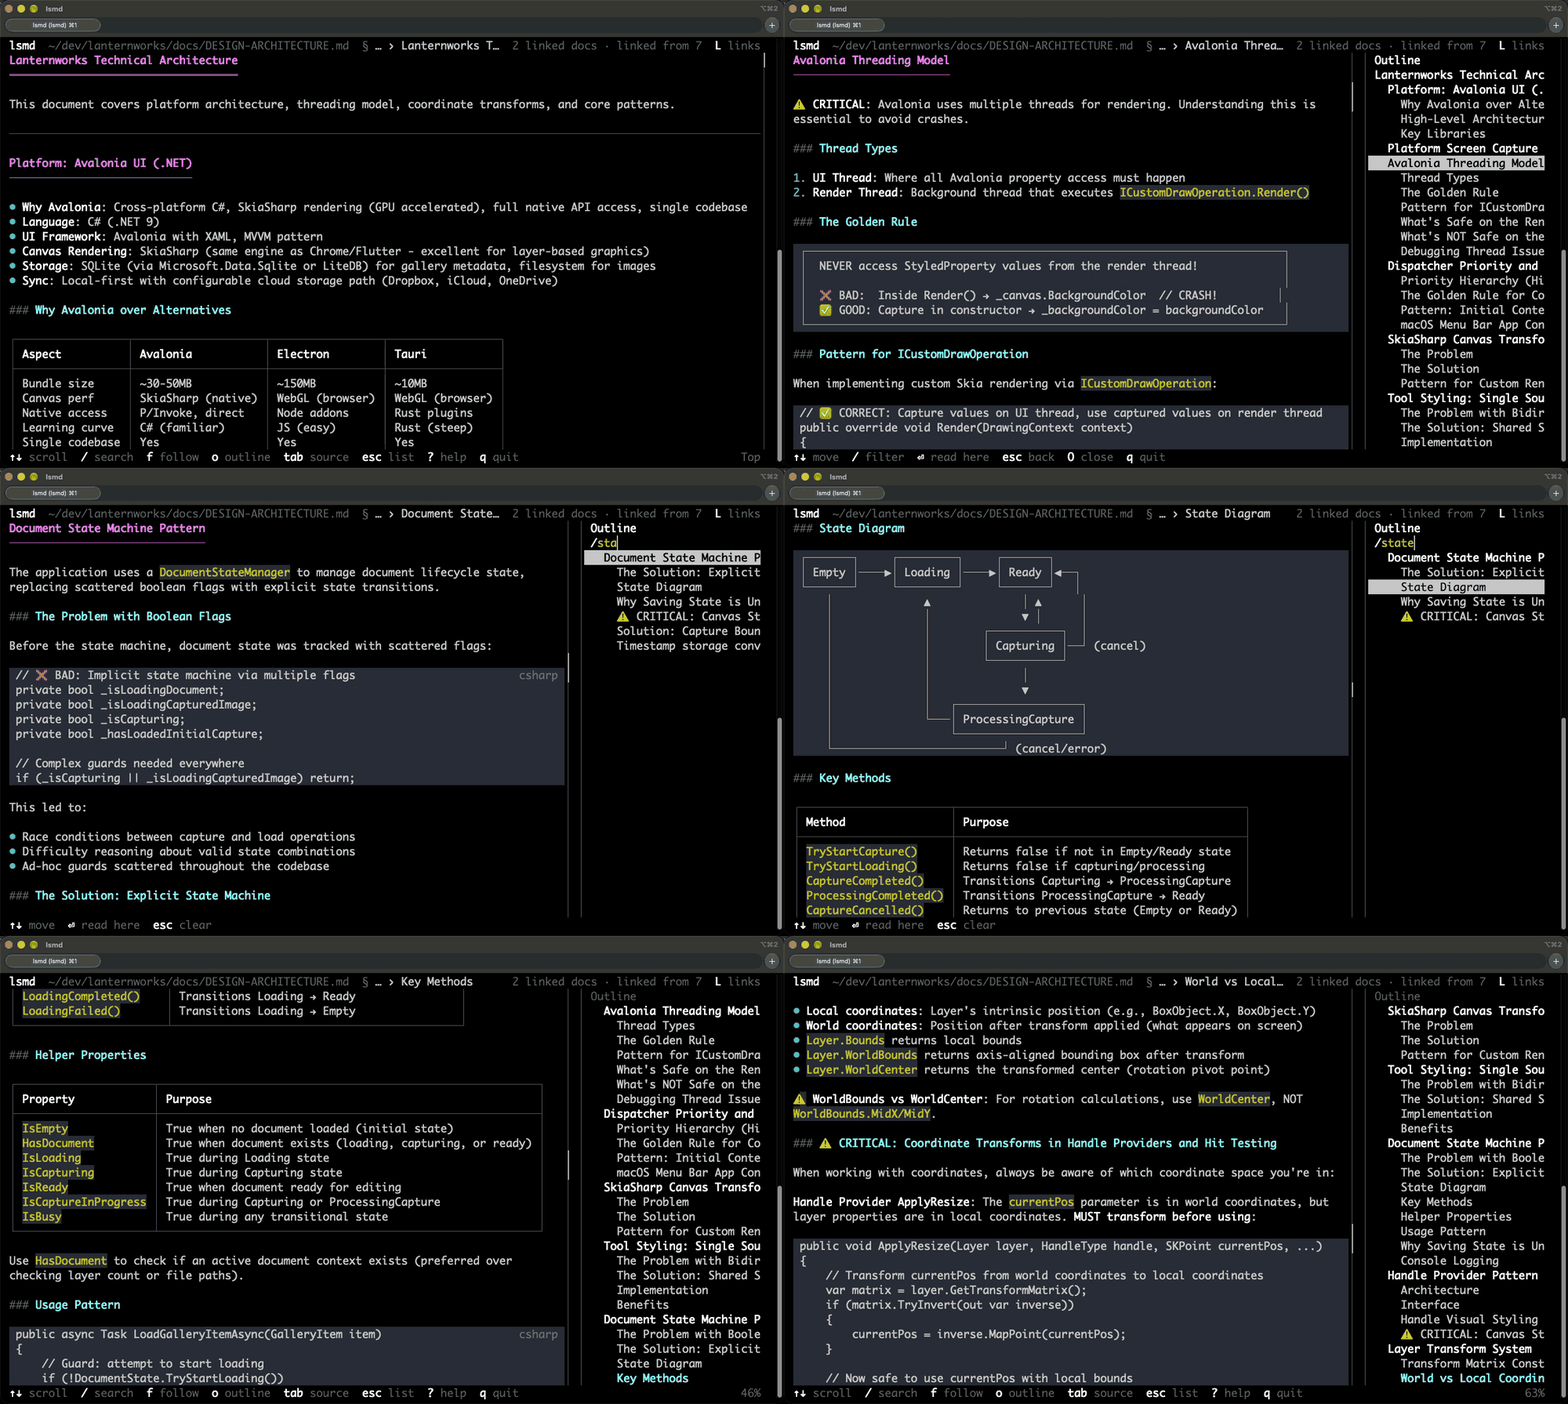
Stays current. Documents reload as they're edited, keeping your place, so lsmd works beside your editor, or beside an agent that's writing. e opens your editor at the line you're reading.
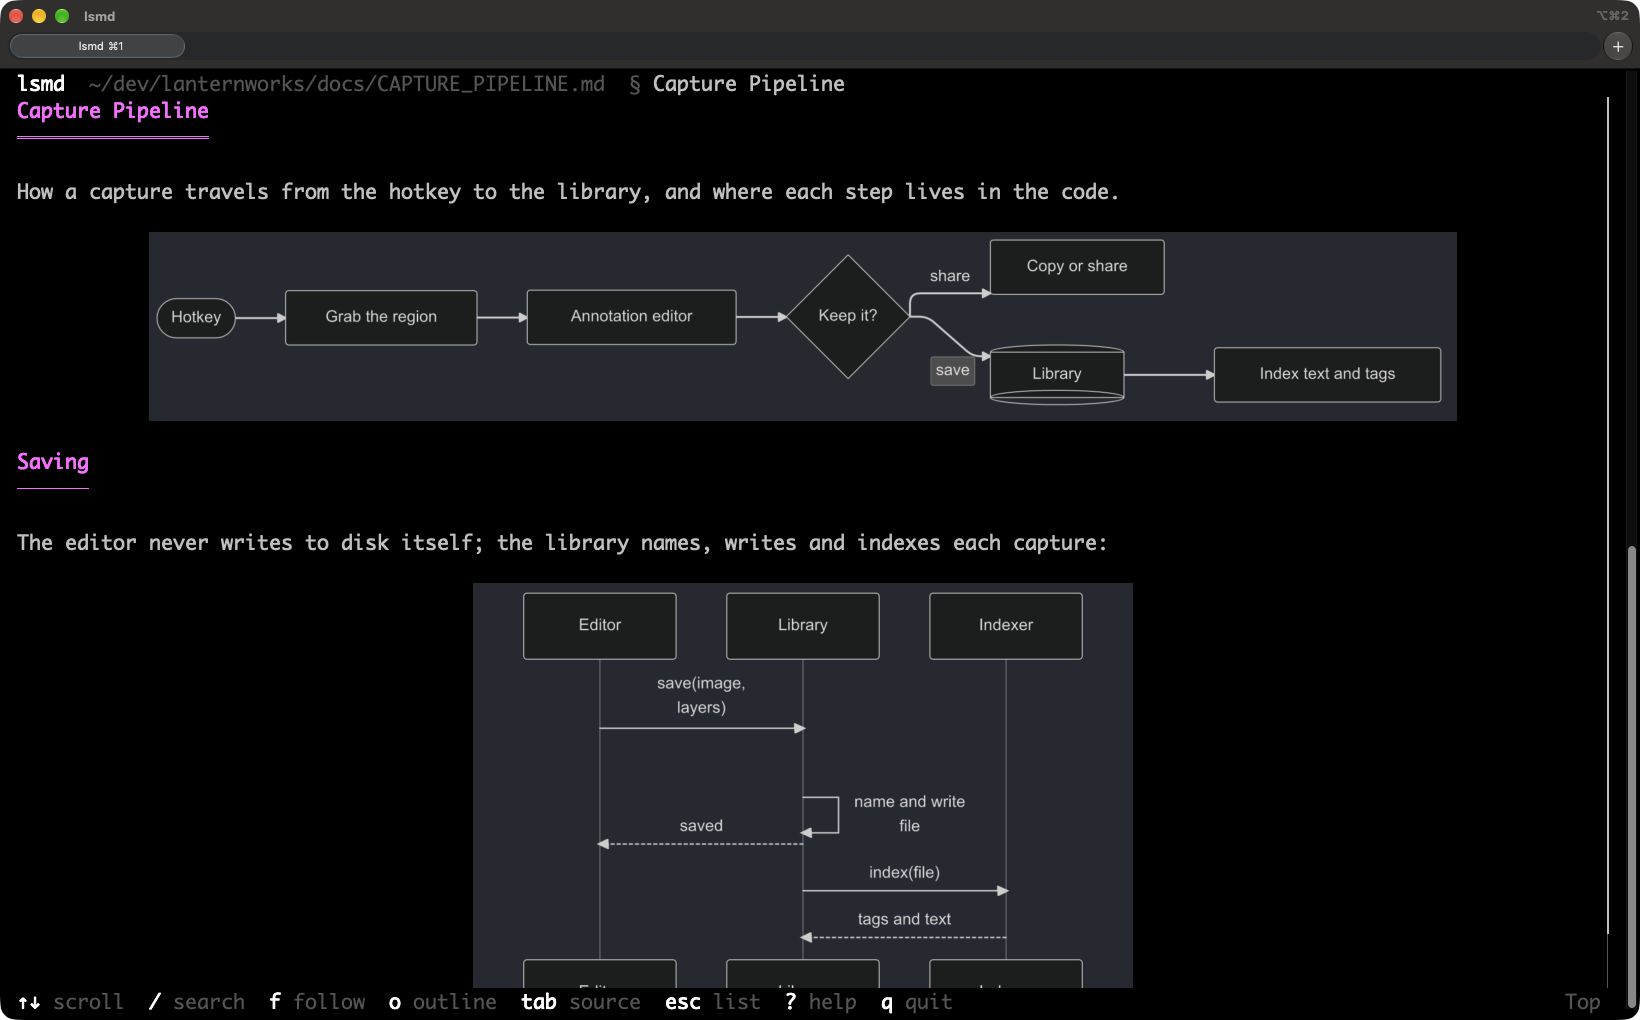
Diagrams and pictures. Mermaid diagrams are drawn in the theme's colors, and images in the project are shown where they are: PNG, JPEG, GIF, WebP or SVG, as Markdown or as the <img /> tags READMEs open their logos with. That works in terminals that can show pictures: iTerm2, Kitty, WezTerm, Ghostty and those with Sixel. Elsewhere, and in tmux, diagrams stay as code and images as their descriptions. Images from the web aren't fetched, so reading a document never reaches out to the internet.
It reads well, too. In Kitty, top-level headings are drawn at twice the size. Text uses the full width of the terminal, and tables, code (long lines wrap, marked ↪, so there's no scrolling sideways), task lists, footnotes, GitHub's > [!NOTE] alerts and the HTML that READMEs open with all render. S shows the Markdown source beside the rendered text, scrolled together, for when you're writing rather than reading, and # numbers the text with the lines it comes from.
lsmd runs on macOS, Linux and Windows. When its output isn't a terminal, lsmd FILE prints the rendered document and lsmd lists the files, for scripts.
Install
lsmd runs on macOS, Linux (x86_64 and 64-bit ARM) and Windows 10 or later (x86_64).
With Homebrew, on macOS and Linux:
brew install sanford/tap/lsmd
On Windows, with Scoop:
scoop bucket add sanford https://github.com/sanford/scoop-bucket
scoop install sanford/lsmd
Or download lsmd-windows-x64.zip from the latest release, unzip it, and put lsmd.exe in a folder on your PATH. It needs nothing else installed. Or, from PowerShell:
$dir = "$env:LOCALAPPDATA\Programs\lsmd"
Invoke-WebRequest https://github.com/sanford/lsmd/releases/latest/download/lsmd-windows-x64.zip -OutFile "$env:TEMP\lsmd.zip"
Expand-Archive "$env:TEMP\lsmd.zip" $dir -Force
[Environment]::SetEnvironmentVariable('Path', "$([Environment]::GetEnvironmentVariable('Path', 'User'));$dir", 'User')
Then open a new terminal and run lsmd.
With Cargo, if you have a Rust toolchain, from crates.io:
cargo install lsmd
Or build from source:
git clone https://github.com/sanford/lsmd
cd lsmd
cargo build --release
./target/release/lsmd
While hacking on it, ./run.sh [ARGS] (or .\run.ps1 [ARGS] on Windows) builds, installs to ~/.local/bin, and runs in one step.
Usage
lsmd                 # browse the Markdown files under this directory
lsmd docs/           # ...under docs/
lsmd README.md       # read one file (Esc for the list of the others)
lsmd -s README.md    # ...with its source alongside
cat notes.md | lsmd  # read standard input
lsmd README.md | less -R   # not a terminal: print it rendered
lsmd | wc -l         # not a terminal: list the files
The list starts with the folders, each showing when its newest file changed and how many files are in it, and the files at the top level; below a line, every file in the folders follows, with its path. A selected folder shows what's in it beside the list. → goes into a folder, listing only what's in it, with / and s narrowed to it too, and ← comes back up, to the folder you left; so does .. at the top of the list. Space opens a folder in place, to look inside without going in. Filtering shows the best-matching folders above the files whose names match, and below them, the files with the filter in their text.
.gitignored and hidden files are left out; -a includes them, and . in the list shows or hides just the hidden ones. -w 100 caps the text width. -p prints without colors, as does setting NO_COLOR.
Keys
In the file list:
| Key | |
|---|
↑ ↓ j k | Move; with Shift (⇧↑ ⇧↓ K J), a page at a time |
Enter → l | Read the selected file, or go into the selected folder |
← h Backspace | Up a folder (or choose .. at the top of the list) |
/ | Filter the list by name (fuzzy); files with it in their text follow, most matches first |
s | Search the text of every file in the list |
m | Sort by name or by date |
. | Show or hide hidden files |
Space | On a folder: look inside without going in, or close it |
Space b | Page through the preview |
q Esc | Quit (Esc first clears the filter, then goes up a folder) |
Reading:
| Key | |
|---|
↑ ↓ j k | Scroll two lines (scroll in the settings), or where links come close together, go link to link (see Links between documents); with Shift (⇧↑ ⇧↓ K J), a page |
Space b, d u, g G | Page, half page; top, bottom |
/ n N | Search this document; next and previous match |
] [ | Next and previous heading |
o | Outline: ↑ ↓ j k go through the headings with the text following as you move, / filters them, Enter reads from there, Esc goes back to where you were |
O | The same outline, kept open beside the document, highlighting the section you're reading. Enter gives the keyboard back to the text, O gives it to the outline again, and O from the outline closes it. In either, c copies, with s and l taking the heading you're on |
Enter l → | Follow the highlighted link |
f | Follow a link: type the letters drawn on it |
L | Links: what this links to, and what links here (in this and the other popups: ↑ ↓ j k move, / filters, Enter goes) |
Esc Backspace ← h | Back to where you were before following a link; then the list |
q | Quit |
Anywhere:
| Key | |
|---|
Tab | Between the file list and the document. From the list, reads the selected file, with the list kept beside it on a terminal 80 columns or wider; from the document, back to the list, which keeps showing what you were reading until you select another file, so Tab again returns to it |
S | Show or hide the source beside the rendered text |
# | Show or hide line numbers: the source line each paragraph, list item, table row and line of code starts on |
Ctrl-W | Scroll the source side or the rendered side (or click the side) |
< > | Move the divider |
e | Edit the file in $VISUAL or $EDITOR, at the line you're reading |
c | Copy: then u the highlighted link, c a code block, s the section, a the whole document, v a selection, l a link to the section, p the path, P the full path (see Copying) |
\ | Keep the file list on screen while reading |
T | Pick a color theme |
? | All of the above |
Ctrl-Z | Suspend, back to the shell; fg comes back (not on Windows) |
Emacs keys work everywhere too: Ctrl-N Ctrl-P move down and up, Ctrl-V Alt-V a page, Alt-< Alt-> to the ends, and Ctrl-G is Esc. In a document, Ctrl-S and Ctrl-R search forward and backward; while you type, they go to the next and previous match, and Ctrl-S on an empty search repeats the last one.
The mouse works too: the wheel scrolls what's under it, the scrollbar and the outline jump where you click, clicking a file selects it and clicking again opens it, clicking the document or either side of the split view gives it the keyboard, clicking a link follows it, and dragging over the text copies what it covers, as Markdown. --no-mouse leaves the mouse to the terminal, so you can select text without holding a modifier key.
Links between documents
The header shows how the document on screen is connected, like 3 linked docs · linked from 2, and L lists those documents with their titles, along with links to sections, other files and the web. Following a link to another Markdown file opens it in lsmd. Web and email links open in your browser or mail app after you confirm, with the site named in the question, or you can copy the address instead; images, PDFs and other documents open in their default app the same way. lsmd won't open anything else a link points to, such as a program, a script or another app's link, since the documents you read may be someone else's.
As you read, the link you're reading by is highlighted, with where it goes in the footer, ready for Enter (or l or →) to follow it and Esc (or h or ←) to come back. It's the one nearest a band a third of the way down the screen, which starts at the top of the screen and ends at the bottom, so even the first and last links get their turn. ↓ and ↑ scroll as usual, but where links come close together, side by side or a line after another, they go link to link first, so none is skipped; in a document that fits on the screen, they go from link to link. f or a click still gets any link at once.
"Linked from" comes from an index of the links between all the Markdown files under the directory you're browsing. It's built in the background when lsmd starts, kept up to date as files change, and saved in ~/.lsmd/index/ so the next start only re-reads files that changed.
Copying
c asks what to copy, in a menu that shows just what each choice will copy: the section's name and length, the link, the path. Its letters copy at once, so cs copies the section; ↑ ↓ and Enter, or a click, work too. Everything but a path is copied as Markdown, as it's written, rather than as it's shown, so it pastes cleanly into an issue, a chat or another document:
c: a code block. With more than one on screen, each gets a letter to type, like links do for f.s: the section you're reading, the one the header names after §, with the sections under it.a: the whole document.v: pieces of it. j and k take in more or fewer paragraphs, list items, table rows or lines of code, and c or Enter copies them. What you take in all of, like a whole code block or list, comes with its fences and markers. Dragging over the text with the mouse does the same, copying when you let go.l: a link to the section, like [Install](docs/setup.md#install), with the path from the folder you're browsing: for pasting into another document, or telling someone (or an agent) where to look.p and P: the file's path, from the folder you're browsing or in full. In the list, the selected folder's.
In the outline, c works the same, with s and l taking the heading you're on, so any section is two keys away.
Copying uses the system clipboard (pbcopy, wl-copy, xclip, xsel or clip). Over SSH they ask your terminal to do the copying instead, with an OSC 52 escape sequence, so the text lands on your own machine. Most modern terminals support this; in tmux, it needs set -g set-clipboard on. macOS Terminal doesn't support it.
Colors
T picks a color theme: the screen changes as you move through the list, Enter keeps the one you're on and saves it in ~/.lsmd/config.toml, and Esc goes back. The themes are Omarchy's: tokyo-night, catppuccin, catppuccin-latte, gruvbox, nord, rose-pine, kanagawa, everforest and more. A theme colors everything, background included, and your terminal goes back to its own colors when lsmd exits. --theme picks one too.
Themes of your own go in ~/.lsmd/themes/, in Omarchy's colors.toml format: as NAME.toml, or as a folder NAME/ with a colors.toml in it, so an Omarchy theme's folder can be copied or linked there as it is. They're listed with the others, and one named like a built-in theme takes its place.
Without one (auto, dark or light), text uses your terminal's own colors, and code is colored by a built-in dark or light theme; auto picks whichever suits the terminal's background.
On Omarchy, the desktop's theme wins: code takes its colors from it, and changes when you switch themes, even in a document you already have open. theme = "dark" or "light" turns this off.
Configuration
Defaults for the options can go in ~/.lsmd/config.toml. lsmd --edit-config opens it in your editor, starting it with every setting listed if there isn't one yet. --config FILE uses another file instead, for trying settings out or for testing; the theme T saves and --edit-config go to it too. Everything is optional, and flags win over it:
theme = "dark"          # auto, dark, light or a theme like "tokyo-night"
width = 100             # wrap text at 100 columns (0: the terminal's width)
source = true           # start with the source shown beside the text
source-side = "left"    # left or right
mouse = false           # leave the mouse to the terminal
all = true              # list hidden and .gitignored files too
sort = "date"           # name or date
outline = true          # show the outline beside documents
images = false          # show diagrams as code and images as text
scroll = 1              # lines j and k scroll (default 2)
big-headings = false    # keep headings the size of the text, even in Kitty
Shell completions and man page
lsmd --completions SHELL prints the script that completes lsmd's options, for bash, zsh, fish, elvish or powershell. For zsh, say:
lsmd --completions zsh > ~/.zfunc/_lsmd # any folder in your $fpath
lsmd --man prints the man page.
License
Copyright (C) 2026 Sanford Lincoln
lsmd is free software: you can redistribute it and/or modify it under the terms of the GNU General Public License as published by the Free Software Foundation, either version 3 of the License, or (at your option) any later version. See LICENSE.
The color themes in themes/ are Omarchy's, copyright (c) David Heinemeier Hansson, and used under the MIT License. See themes/LICENSE.