GlazeWM is a tiling window manager for Windows designed to provide efficient window organization and dynamic layout adjustments using keyboard-driven commands.
Key Features:
Simple YAML configuration for easy customization of workspaces, gaps, and rules.
Multi-monitor support with seamless workspace management across screens.
Customizable window rules to define specific behaviors for applications.
Integration with Zebar as an optional status bar for enhanced functionality.
Easy one-click installation or via package managers like winget.
Audience & Benefit:
Ideal for productivity-focused users, power users, and developers seeking a flexible and efficient workspace management solution. GlazeWM empowers users to optimize their workflow by quickly organizing windows and adjusting layouts on the fly, ensuring maximum focus and productivity.
GlazeWM can be installed via winget or other package managers, making it easy to set up on any Windows system.
README
> V3 is finally out - check out the changelog here 🔥
GlazeWM
A tiling window manager for Windows inspired by i3wm.
GlazeWM lets you easily organize windows and adjust their layout on the fly by using keyboard-driven commands.
Local development and guidelines are available in the contributing guide.
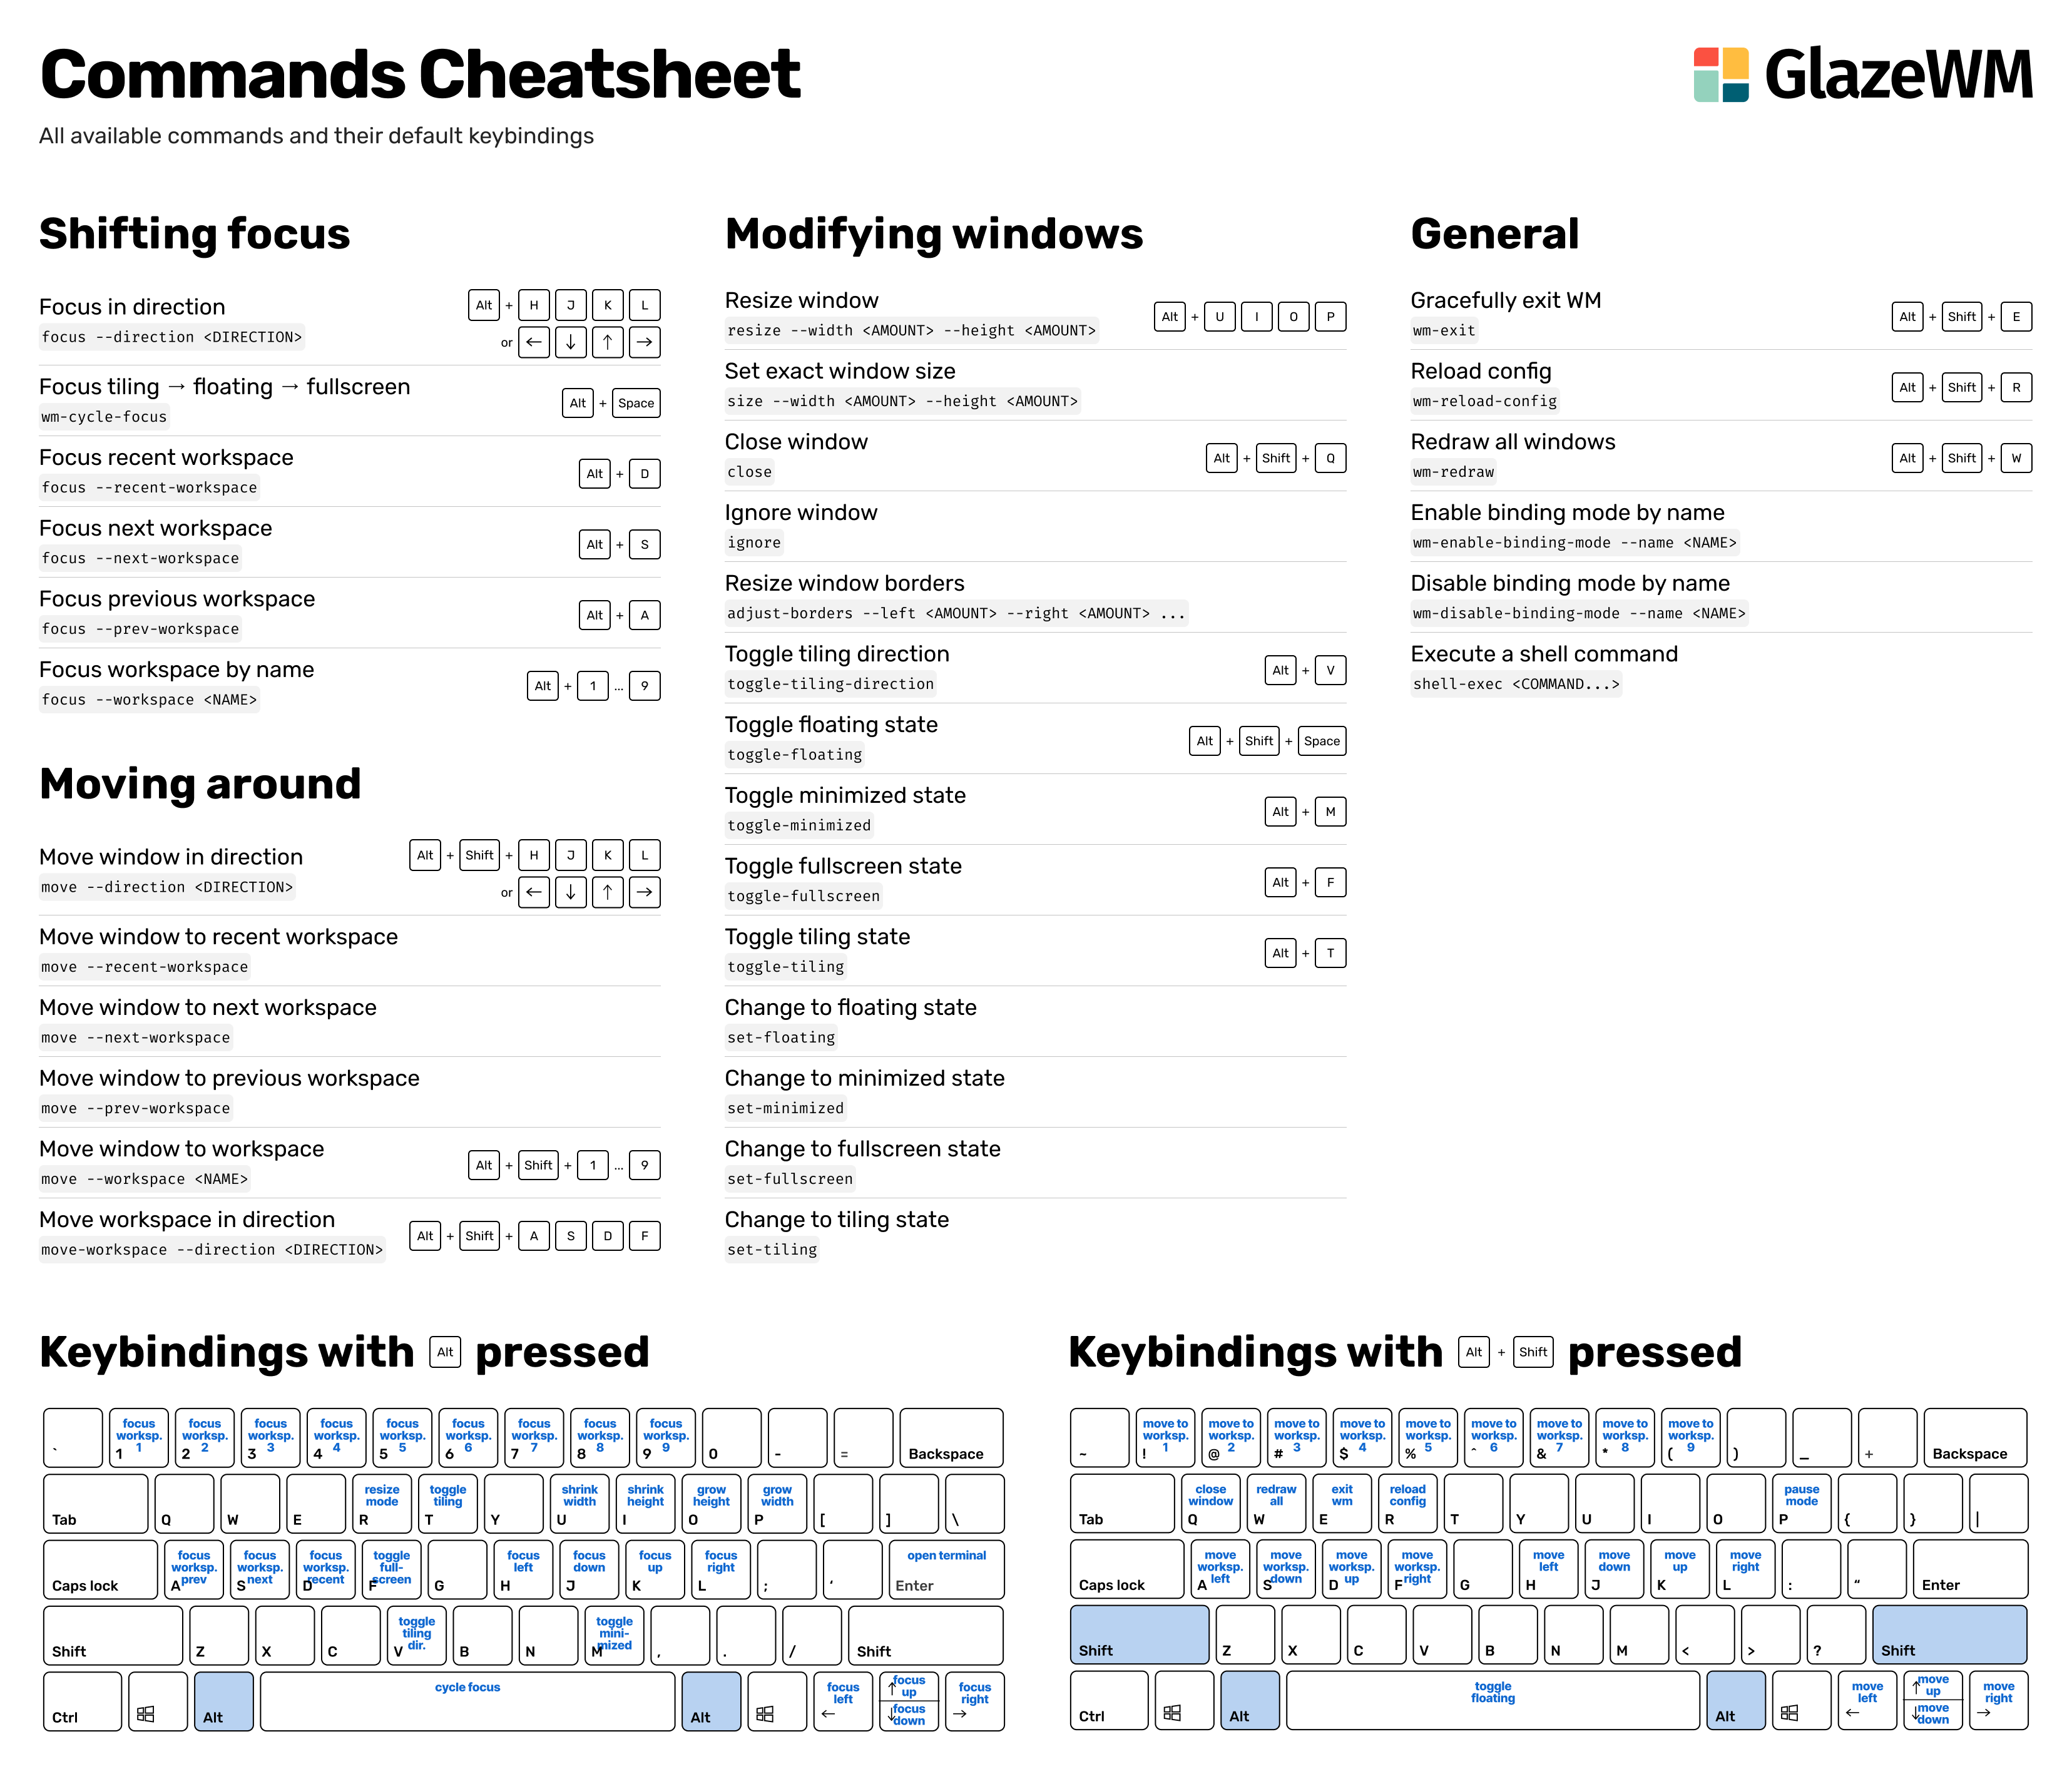
Default keybindings
On the first launch of GlazeWM, a default configuration can optionally be generated.
Below is a cheat sheet of all available commands and their default keybindings.
Config documentation
The default config file is generated at %userprofile%\.glzr\glazewm\config.yaml.
To use a different config file location, you can launch the GlazeWM executable with the CLI argument --config="...", like so:
./glazewm.exe start --config="C:\\config.yaml"
Or pass a value for the GLAZEWM_CONFIG_PATH environment variable:
setx GLAZEWM_CONFIG_PATH "C:\\config.yaml"
With the benefit of using a custom path being that you can choose a different name for the config file, such as glazewm.yaml.
Config: General
general:
  # Commands to run when the WM has started (e.g. to run a script or launch
  # another application).
  startup_commands: []

  # Commands to run just before the WM is shutdown.
  shutdown_commands: []

  # Commands to run after the WM config has reloaded.
  config_reload_commands: []

  # Whether to automatically focus windows underneath the cursor.
  focus_follows_cursor: false

  # Whether to switch back and forth between the previously focused
  # workspace when focusing the current workspace.
  toggle_workspace_on_refocus: false

  cursor_jump:
    # Whether to automatically move the cursor on the specified trigger.
    enabled: true

    # Trigger for cursor jump:
    # - 'monitor_focus': Jump when focus changes between monitors.
    # - 'window_focus': Jump when focus changes between windows.
    trigger: "monitor_focus"
Config: Keybindings
The available keyboard shortcuts can be customized via the keybindings option. A keybinding consists of one or more key combinations and one or more commands to run when pressed.
It's recommended to use the alt key for keybindings. The Windows key is unfortunately a pain to remap, since the OS reserves certain keybindings (e.g. lwin+l).
keybindings:
  # Command(s) to run.
  - commands: ["focus --workspace 1"]

    # Key combination(s) to trigger the keybinding.
    bindings: ["alt+1"]

  # Multiple commands can be run in a sequence (e.g. to move a window to a
  # workspace + focus workspace).
  - commands: ["move --workspace 1", "focus --workspace 1"]
    bindings: ["alt+shift+1"]
Full list of keys that can be used for keybindings:
Keys list
Key
Description
a - z
Alphabetical letter keys
0 - 9
Number keys
numpad0 - numpad9
Numerical keypad keys
f1 - f24
Function keys
shift
Either left or right SHIFT key
lshift
The left SHIFT key
rshift
The right SHIFT key
control
Either left or right CTRL key
lctrl
The left CTRL key
rctrl
The right CTRL key
alt
Either left or right ALT key
lalt
The left ALT key
ralt
The right ALT key
lwin
The left ⊞ Windows logo key
rwin
The right ⊞ Windows logo key
space
The spacebar key
escape
The ESCAPE key
back
The BACKSPACE key
tab
The TAB key
enter
The ENTER key
left
The ← arrow key
right
The → arrow key
up
The ↑ arrow key
down
The ↓ arrow key
num_lock
The NUM LOCK key
scroll_lock
The SCROLL LOCK key
caps_lock
The CAPS LOCK key
page_up
The PAGE UP key
page_down
The PAGE DOWN key
insert
The INSERT key
delete
The DELETE key
end
The END key
home
The HOME key
print_screen
The PRINT SCREEN key
multiply
The * key (only on numpad)
add
The + key (only on numpad)
subtract
The - key (only on numpad)
decimal
The DEL key (only on numpad)
divide
The / key (only on numpad)
volume_up
The volume up key
volume_down
The volume down key
volume_mute
The volume mute key
media_next_track
The media next track key
media_prev_track
The media prev track key
media_stop
The media stop key
media_play_pause
The media play/pause key
oem_semicolon
The ;/: key on a US standard keyboard (varies by keyboard)
oem_question
The //? key on a US standard keyboard (varies by keyboard)
oem_tilde
The `/~ key on a US standard keyboard (varies by keyboard)
oem_open_brackets
The [/{ key on a US standard keyboard (varies by keyboard)
oem_pipe
The \/| key on a US standard keyboard (varies by keyboard)
oem_close_brackets
The ]/} key on a US standard keyboard (varies by keyboard)
oem_quotes
The '/" key on a US standard keyboard (varies by keyboard)
oem_8
The `/¬ key on a UK keyboard (varies by keyboard)
oem_102
The \/| key next to left Shift on ISO keyboards (varies by keyboard)
oem_plus
The =/+ key on a US standard keyboard (varies by keyboard)
oem_comma
The ,/< key on a US standard keyboard (varies by keyboard)
oem_minus
The -/_ key on a US standard keyboard (varies by keyboard)
oem_period
The ./> key on a US standard keyboard (varies by keyboard)
muhenkan
The 無変換 (non-convert) key for Japanese keyboard layouts
henkan
The 変換 (convert) key for Japanese keyboard layouts
If a key is not in the list above, it is likely still supported if you use its character in a keybinding (e.g. alt+å for the Norwegian Å character).
> German and US international keyboards treat the right-side alt key differently. For these keyboard layouts, use ralt+ctrl instead of ralt to bind the right-side alt key.
Config: Gaps
The gaps between windows can be changed via the gaps property in the config file. Inner and outer gaps are set separately.
gaps:
  # Gap between adjacent windows.
  inner_gap: "20px"

  # Gap between windows and the screen edge.
  outer_gap:
    top: "20px"
    right: "20px"
    bottom: "20px"
    left: "20px"
Config: Workspaces
Workspaces need to be predefined via the workspaces property in the config file. A workspace is automatically assigned to each monitor on startup.
workspaces:
  # This is the unique ID for the workspace. It's used in keybinding
  # commands, and is also the label shown in 3rd-party apps (e.g. Zebar) if
  # `display_name` is not provided.
  - name: "1"

    # Optional override for the workspace label used in 3rd-party apps.
    # Does not need to be unique.
    display_name: "Work"

    # Optionally force the workspace on a specific monitor if it exists.
    # 0 is your leftmost screen, 1 is the next one to the right, and so on.
    bind_to_monitor: 0

    # Optionally prevent workspace from being deactivated when empty.
    keep_alive: false
Config: Window rules
Commands can be run when a window is first launched. This is useful for adding window-specific behaviors like always starting a window as fullscreen or assigning to a specific workspace.
Windows can be targeted by their process, class, and title. Multiple matching criteria can be used together to target a window more precisely.
window_rules:
  - commands: ["move --workspace 1"]
    match:
      # Move browsers to workspace 1.
      - window_process: { regex: "msedge|brave|chrome" }

  - commands: ["ignore"]
    match:
      # Ignores any Zebar windows.
      - window_process: { equals: "zebar" }

      # Ignores picture-in-picture windows for browsers.
      # Note that *both* the title and class must match for the rule to run.
      - window_title: { regex: "[Pp]icture.in.[Pp]icture" }
        window_class: { regex: "Chrome_WidgetWin_1|MozillaDialogClass" }
Config: Window effects
Visual effects can be applied to windows via the window_effects option. Currently, colored borders are the only effect available with more to come in the future.
> Note: Window effects are exclusive to Windows 11.
window_effects:
  # Visual effects to apply to the focused window.
  focused_window:
    # Highlight the window with a colored border.
    border:
      enabled: true
      color: "#0000ff"

  # Visual effects to apply to non-focused windows.
  other_windows:
    border:
      enabled: false
      color: "#d3d3d3"
Config: Window behavior
The window_behavior config option exists to customize the states that a window can be in (tiling, floating, minimized, and fullscreen).
window_behavior:
  # New windows are created in this state whenever possible.
  # Allowed values: 'tiling', 'floating'.
  initial_state: "tiling"

  # Sets the default options for when a new window is created. This also
  # changes the defaults for when the state change commands, like
  # `set-floating`, are used without any flags.
  state_defaults:
    floating:
      # Whether to center floating windows by default.
      centered: true

      # Whether to show floating windows as always on top.
      shown_on_top: false

    fullscreen:
      # Maximize the window if possible. If the window doesn't have a
      # maximize button, then it'll be made fullscreen normally instead.
      maximized: false
Config: Binding modes
Binding modes are used to modify keybindings while GlazeWM is running.
A binding mode can be enabled with wm-enable-binding-mode --name and disabled with wm-disable-binding-mode --name .
binding_modes:
  # When enabled, the focused window can be resized via arrow keys or HJKL.
  - name: "resize"
    keybindings:
      - commands: ["resize --width -2%"]
        bindings: ["h", "left"]
      - commands: ["resize --width +2%"]
        bindings: ["l", "right"]
      - commands: ["resize --height +2%"]
        bindings: ["k", "up"]
      - commands: ["resize --height -2%"]
        bindings: ["j", "down"]
      # Press enter/escape to return to default keybindings.
      - commands: ["wm-disable-binding-mode --name resize"]
        bindings: ["escape", "enter"]
FAQ
Q: How do I run GlazeWM on startup?
Right-click the GlazeWM icon in the system tray and select "Run on system startup".
Q: How can I create ``?
You can create custom layouts by changing the tiling direction with alt+v. This changes where the next window is placed in relation to the current window. If the current window's direction is horizontal, the new window will be placed to the right of it. If it is vertical, it will be placed below it. This also applies when moving windows; the tiling direction of the stationary window will affect where the moved window will be placed.
To match a specific application, you need a command to execute and either the window's process name, title, or class name. For example, if you use Flow-Launcher and want to make the settings window float, you can do the following:
Programs like Winlister or AutoHotkey's Window Spy can be useful for getting info about a window.
Q: How can I ignore GlazeWM's keybindings when `` is focused?
This isn't currently supported, however, the keybinding alt+shift+p in the default config is used to disable all other keybindings until alt+shift+p is pressed again.