vLabeler is an open-source voice labeling application designed to simplify the process of creating and editing voice labels for various applications such as voice synthesis, speech processing, and audio production. It provides a modern, user-friendly interface with customizable tools tailored for different voice generation software.
Key Features:
Customizable Labeling: Supports multiple labelers including UTAU oto.ini, Sinsy lab files, Audacity labels, and TextGrid files.
Cross-Platform Support: Available on Windows, macOS (Intel/Apple Silicon), and Linux with packages provided for ease of installation via winget.
Advanced Editing Tools: Offers keyboard shortcuts, audio playback controls, and quick edit features for efficient workflow.
Project Management: Allows creation of projects from single files or directories, with options to import templates using plugins.
Audience & Benefit:
Ideal for voice artists, researchers, and developers working on voice synthesis projects. vLabeler streamlines the labeling process, enhances productivity, and offers flexibility through its customizable tools and cross-platform availability.
Currently, the followings are provided as built-in labelers:
Working on UTAU oto.ini
For UTAU oto editing, there are two items in the built-in labeler list:
UTAU oto labeler
If you only want to edit one oto.ini file, please use this labeler.
UTAU singer labeler
If you want to edit multiple oto.ini files under a singer voicebank, please use this labeler.
Please set the singer's root folder (which usually contains a character.txt file) as the Sample Directory when you
create the project.
Working on audio labels
For label files used in NNSVS/ENUNU and similar systems, the following options are available now:
Sinsy lab labeler
This labeler is for Sinsy (NNSVS/ENUNU) lab files, which uses 100ns as the time unit and use (space) as the
separator.
It only accepts one label file per project. A wav file is bound to the label file by the file name, e.g.,
if the input label file is foo.lab, the wav file named foo.wav will be selected from the Sample Directory.
Audacity labeler
This labeler is for Labels file created by Audacity, which uses s as the time unit and use \t (tab) as the
separator.
It only accepts one label file per project. A wav file is bound to the label file by the file name, e.g.,
if the input label file is foo.txt, the wav file named foo.wav will be selected from the Sample Directory.
NNSVS singer labeler
This labeler is basically the same with the Sinsy lab labeler, but it can handle multiple label files.
Typically, if you have the following file structures:
you can create a project containing all the label files by setting Sample Directory to the singer folder.
You can change the wav and lab folder names in the labeler's settings.
Select a folder containing your sample files as Sample Directory
Change Project name if you would like
Select a labeler, see Scenarios for which labeler to use
Select a way that your project is created. Default is suitable for most cases
If you want to import a single file as input, select File and set the file path. This option is not allowed with
some labelers
If you want to generate templates with a plugin, select Template generator and set up the plugin
Click Finish and start editing
Click Export in the menu to get the edited label file
There are more settings folded as Advanced settings, or provided by the labelers/plugins, please check them out if you
need more customization.
Start quick edit
Some labelers support the Quick edit feature, which allows you to start editing with only single file or folder
as input. The other settings are automatically set by the labeler.
You can click the item in the Quick Edit list in the start page and select the file or folder to start quick edit.
In a project that is created through quick edit:
auto export is enabled by default, means when you save the project, the label file is saved automatically
when you start quick edit repeatedly, project file might be silently overwritten
the saved labeler settings are used, except for some items that are configured to certain values for quick edit by the
author of the labeler
you may still change some of the settings in File -> Project settings...
Available keyboard/mouse actions
Note that the following Ctrl is mapped to Command if you are using macOS.
You can customize the key bindings in Settings -> Prefereneces -> Keymaps.
Move parameter lines
Mouse drag on normal parameters: move itself
Mouse drag on primary parameters: move all the lines together
Shift: invert normal/primary. e.g. mouse drag on primary parameters with Shift pressed only moves itself.
Q/W/E/R/... : move the corresponding parameter line to current cursor position. The order is defined in the
labeler. Note that this feature is only available in the single entry editing mode.
Audio playback
Space: play the current entry, or stop playing if already playing
Shift + Space: play the current sample file or stop playing if already playing
Ctrl + Shift + Space: play the audio with current screen range or stop playing if already playing
(with most tools) mouse right click: play the clicked section
(with the Cursor tool) Alt + mouse drag on parameters: play the audio near the cursor's position while moving
Please also see the section of the Playback tool for more actions.
Scrolling
Shift + mouse wheel scroll: horizontal scroll
F or Focus button in the center of the bottom bar: Scroll to center the current entry on the screen
Zoom in/out
= or + button in the bottom bar: zoom in
- or - button in the bottom bar: zoom out
Ctrl + Shift + mouse wheel scroll: zoom in/out
Resolution button in the bottom bar: open dialog for resolution input
Switch entry/sample
Mouse wheel scroll: go to previous/next entry
Up/Down: go to previous/next entry
</> buttons in the bottom bar: go to previous/next entry
Ctrl + mouse wheel scroll: go to previous/next sample
Ctrl + Up/Down: go to previous/next sample
<</>> buttons in the bottom bar: go to previous/next sample
Ctrl + G or entry number button in the bottom bar: show Go to entry... dialog
Set notes for entry
J or Add tag button in the entry title bar: Start editing the entry's tag
K or Star button in the entry title bar: Toggle the entry's Starred status
L or Done button in the entry title bar: Toggle the entry's Done status
Settings for notes
You can change settings in Settings -> Prefereneces -> Editor -> Notes to hide the items that
you don't need.
Post-editing actions
You can change settings in Settings -> Prefereneces -> Editor -> Post-editing actions to automatically execute
the following actions after editing entries:
Go to next entry
Set the edited entry as Done (enabled by default)
Quickly launch batch edit plugins
F1~F8: launch the corresponding batch edit plugin. Need to be configured in
Tools -> Batch Edit -> Slot Settings... before use. About plugins, see Plugins for more details.
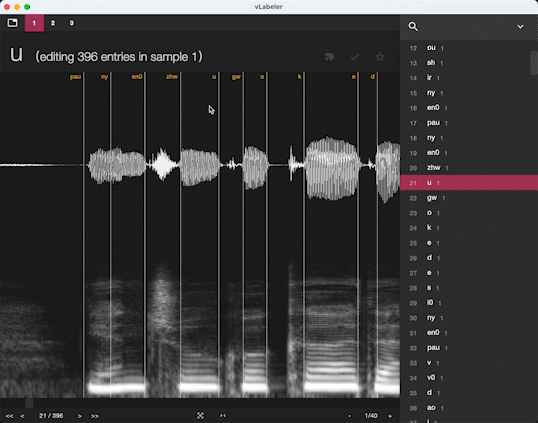
Multi-entry editing mode
For labelers in continuous mode (example), you can switch between the
single entry editing mode and a multi-entry editing mode which shows and allows you to edit all the connected entries in
the same sample file.
It's enabled by default. You can click the Single/Mutiple button in the center of the bottom bar to enable or disable
it.
In the multi-entry editing mode, names of the entries are displayed at the top of the editor.
By clicking the names, the following actions are conducted:
Click: Rename the entry
Long click: Go to the entry
Support other audio formats
You can install ffmpeg to support more audio formats. You can download it from
the official website.
You need to then configure the path to the ffmpeg executable
in Settings -> Prefereneces -> Charts -> Audio Format Support.
For macOS/Linux, you can install ffmpeg into bin or your system path, so the default path ffmpeg works.
Video integration
You can attach a video to the sample file with the same name and duration, and watch the video while you're editing.
For example:
(sample folder)
    - 1.wav
    - 1.mp4
    - 2.wav
    - 2.webm
You need to install VLC to use this feature. You can download it
from here.
Note that even on an Apple Silicon mac, you will need a macOS version instead of a macOS (AppleSilicon) version if
you are using the application downloaded from Release page of this repository.
Use shortcut Ctrl + V or Ctrl + Shift + V to open the attached video in the left-bottom corner or in a new
window.
The video will be played silently along with the sample file.
Browsing entries
There are two components showing an entry list:
The pinned entry list: shown on the right side of the editor by default. You can toggle it by via menu View
-> Pin Entry List. It provides a full powered entry filter (described below).
The Go to entry... dialog: shown when you press Ctrl + G or click the entry number button in the bottom bar.
It provides a simple entry filter.
Searching and filtering entries
In both types of entry list, you can use the following syntax to search entries:
aaa;name:bbb;sample:ccc;tag:ddd
Multiple conditions can be combined with ;. Only entries that match all the conditions are shown.
The following condition keys (the part left to :) are supported:
no key: search in the entry name, sample name (without extension) or tag
name: search in the entry name
sample: search in the sample name (without extension)
tag: search in the tag
The match type for this search is contains.
In the pinned entry list, you can click the Expand button to show more options.
For the Done filter and Star filter, clicking will switch them between Do not filter, Show only starred/done
and Show only unstarred/undone.
All these filters are combined with AND logic.
You can click the More button to open a dialog to use the advanced filters.
Linking filter to editor
By default, project navigation (go to next sample/entry etc. by keyboard shortcuts, mouse wheel scroll or button click)
is not affected by the filter.
For example, even if you have filtered out entry no.5 in the entry list, you can still press Down key to go to the
entry no.5 from entry no.4.
The Link button in the expanded filter can help you concentrate on a specific set of entries. When it's toggled, the
entries that are not shown in the pinned entry list will be skipped when navigating.
In the above example, if you have toggled the Link button, you will go to entry no.6 when pressing Down key
instead ofno.5.
Note that the Go to entry... dialog is not affected by the linked filter, so you can still go to any entry by it
without changing or clearing your filter settings in the pinned entry list.
Tools
The following editing tool is provided.
You can use shortcuts or menu items under Edit -> Tools to switch tools, or toggle the toolbox by menu View
-> Show Toolbox.
Cursor
The normal cursor tool to drag parameter controllers.
Scissors
Cut the entry into two parts by your click position.
This is typically used in the Multi-entry editing mode to create new labels.
By default, when you click on a valid position with the scissors:
Audio of the first part after cutting is played so that you can confirm the phoneme
An input box is shown in the editor to rename the first part
You can press Enter to confirm the input, or press Esc to cancel
If you move the cursor away from the clicked position, the input is confirmed as well
Cutting is conducted. The first one uses your input as its name, and the second one uses the original name
The editor goes to the first entry after cutting
In single-entry editing mode, the name input is requested in a dialog instead of in the editor.
These actions can be customized in Prefereneces -> Editor -> Scissors.
Pan
Or the hand tool. Drag on the editor to scroll the canvas.
Playback
Use mouse click or drag to play a certain range of the current sample file.
The following actions are available as default. You can change the key bindings
in Settings -> Prefereneces -> Keymaps -> Mouse click actions.
Left click: play the audio from the clicked position until the end of the audio
Right click: play the audio from the clicked position until the end of the screen
Shift + left click: play the audio from the start of the file until the clicked position
Shift + right click: play the audio from the start of the screen until the clicked position
Ctrl + left click & drag: play the audio in the dragged range
Ctrl + Shift + left click & drag: play the audio in the dragged range repeatedly
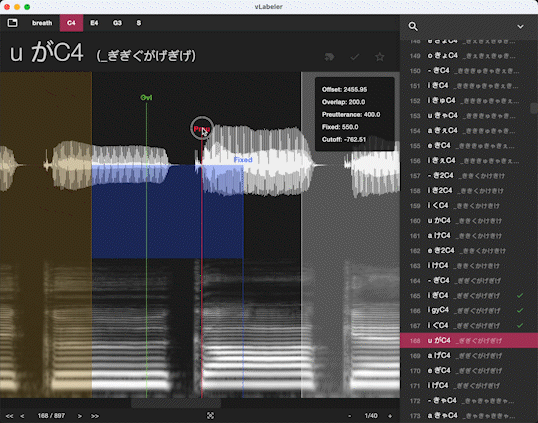
Labelers
A "labeler" is a configuration file for vLabeler which defines the behavior of a certain type of voice generation
software.
For example, the built-in UTAU oto labeler is a labeler for editing UTAU's oto.ini files.
A labeler defines:
what data/fields a voice entry should contain (e.g. for UTAU, you need fixed, preutterance, overlap, etc.)
how the data/fields are displayed in the editor as parameter controllers
whether entries should be connected (every entry's start should be the same as the previous entry's end)
how to parse a label file to a vLabeler project
how to generate a label file from a vLabeler project
how to build subprojects under a vLabeler project
and more behaviors when editing the certain type of label files
A labeler may also support some configurable fields via GUI, without changing the labeler's file itself.
You can find the settings in the Settings icon next to the labeler selector in the New Project page.
If you want to edit the labels for a voice generation software that is not supported by vLabeler,
instead of requesting development supporting that software, you can create a labeler to make it work. (it requires
some knowledge of the coding though).
Please check Develop Custom Labelers for details about labeler development.
You can import your own labelers in Settings -> Labelers....
You can also distribute the labelers created by yourself to other users, or contact us for making them built-in.
Plugins
Currently, two types of plugins are available.
Template generators
A template generator can help generate project templates from input files and parameters.
Compared to a default template generated by the labeler which is literally minimum to include all the sample files
given, a template generator plugin can create complicated templates. It's also more customizable with user input
parameters.
All valid template generators which support the selected labeler can be chosen on the New Project page.
You can import/delete/disable template generators in Settings -> Template Generators....
Batch edit plugins
Batch edit plugins can be used to conduct complicated batch editing tasks.
You can find available batch edit plugins in Tools -> Batch Edit. Some displayed plugins may not be clickable, if
it is not supported by the current labeler.
You can import/delete/disable batch edit plugins in Tools -> Batch Edit -> Manage plugins....
resampler-test: Play the UTAU resampler output of the current
entry, which is similar to setParam's synthesis test (F10).
oto-timing-test: Play the entry aligned with metronome clicks
for checking the utterance setting, which is similar to setParam's utterance timing (F8).
Plugin Development
We welcome plugin development for the application.
You can distribute your plugin anywhere, or create a pull request to make it built-in.
The Scroll Canvas to Left/Right actions in Keymap -> Mouse scroll actions cannot be changed at present.
If you are using a trackpad, we recommend you to disable the Go to Next/Previous Entry actions in the same page, so
that you can scroll the canvas by trackpad without triggering the entry navigation actions.
On Linux, the file chooser may not be able to select an empty folder. Please create something inside, or copy + paste
its path
On Linux, sometimes the application may not be able to recycle memory properly.
You can use Tools -> Recycle Memory to force it to recycle memory.
Sometimes the window freezes unexpectedly. You can resize the window to refresh it.
If all texts besides the menu bar are invisible, please try setting the environment variable SKIKO_RENDER_API to
SOFTWARE.
On some Linux distributions, the file dialogs may not work properly. In this case, you can enable a custom file
dialog in Settings -> Preferences -> Miscellaneous. Please note that the custom file dialog may not be as
powerful as the system file dialog.