WinSnipper



Ultra-lightweight screenshot and screen recording tool for Windows, built
for fast feedback loops — especially pasting annotated screenshots into AI
coding chats. Replaces the built-in Win+Shift+S snip with a tighter flow:
snip → auto-save + clipboard → floating thumbnail → annotate → paste anywhere.
And the same flow for video: Win+Shift+D → pick a region/window/screen →
MP4 → trim → paste as a file.
Single-file exe. .NET 8 + WPF, no external packages — video encoding is
hand-rolled Media Foundation interop, capture is Windows.Graphics.Capture /
DXGI Desktop Duplication. The core app is under 0.4 MB; OCR ships as a separate
flavor so the lightweight build stays lightweight.
Install
Grab a build from Releases and run it — it lives in the tray.
Two flavors:
| File | Size | What you get |
|---|
WinSnipper.exe | ~0.4 MB | The full flow — snip, record, trim, thumbnail, annotate, redact |
WinSnipper-OCR.exe | ~27 MB | Everything above + Copy Text (Windows OCR) + Windows.Graphics.Capture recording (records hardware-overlay video — browser video playback — that other capture paths show as black) |
Both need the .NET 8 Desktop Runtime.
Tick Start with Windows in Settings if it earns a permanent spot.
Not on winget yet. The submission (winget-pkgs#386835)
passed validation but was auto-closed as stale on 2026-06-26: the Microsoft CLA
was never signed, so the bot kept it blocked. Manifests for the current version
live in packaging/winget/ and are ready to resubmit once that's done.
🤖 Install via an AI agent
Using Claude Code, Copilot, or any agent with shell access? Paste this:
> Install WinSnipper for me: download the latest release from
> https://github.com/v2matosevic/WinSnipper/releases/latest — the asset is
> WinSnipper.exe (lite) or WinSnipper-OCR.exe (adds OCR text copy; I'll tell
> you which I want) — into %LOCALAPPDATA%\WinSnipper\, make sure the .NET 8
> Desktop Runtime is installed (winget install Microsoft.DotNet.DesktopRuntime.8),
> then run the exe. It lives in the tray; Win+Shift+S takes a screenshot.
> If I ask for autostart, enable "Start with Windows" is in its tray Settings.
Equivalent script:
$dir = "$env:LOCALAPPDATA\WinSnipper"
New-Item -ItemType Directory -Force $dir | Out-Null
Invoke-WebRequest "https://github.com/v2matosevic/WinSnipper/releases/latest/download/WinSnipper.exe" -OutFile "$dir\WinSnipper.exe"
& "$dir\WinSnipper.exe"
Keeping it running
WinSnipper is a tray app with no window, so when it dies you find out by
pressing the hotkey and getting nothing. From a clone of this repo, double-click
WinSnipper.cmd — it builds if there is no build, enables autostart, installs a
keep-alive task, drops a desktop and Start Menu shortcut, and starts the app.
Safe to re-run; it only does what is missing.
The same thing from a shell, plus the day-to-day commands:
pwsh -File tools\winsnipper.ps1 setup     # from zero: build, install, start
pwsh -File tools\winsnipper.ps1 status    # running? which build? watchdog armed?
pwsh -File tools\winsnipper.ps1 restart   # after a rebuild
pwsh -File tools\winsnipper.ps1 logs      # session / crash / recorder logs
pwsh -File tools\winsnipper.ps1 build -Flavor both
pwsh -File tools\winsnipper.ps1 uninstall # drop the task, run key and shortcuts
The keep-alive task (WinSnipper Keep-Alive in Task Scheduler) runs the exe
with --watchdog every 2 minutes. A live instance turns that into a no-op via
the single-instance mutex; a dead one gets replaced. Quitting from the tray
writes %APPDATA%\WinSnipper\user-quit.flag, which --watchdog honours — so a
crash comes back within two minutes and a deliberate quit stays quit until you
start it again. Task Scheduler counts the running exe as the task, so while the
app is alive the ticks cost nothing.
When it does vanish, %APPDATA%\WinSnipper\session.log says why. Every run
that claims the mutex logs a startup line and, if it shuts down cleanly, a
matching exit line with the reason. A startup with no exit after it was
killed or crashed hard — that is the signature to look for. Stack traces go to
crash.log, recording backend decisions to recorder.log.
Flow
- Press Win+Shift+S (rebindable) — screen freezes, drag a region, done.
- The snip is saved to your snips folder and copied to the clipboard.
- A small floating thumbnail appears bottom-right of the display you
snipped on — not the primary one — for a few seconds. Thumbnails stack
upward per monitor, and placement is correct across displays running
different scaling:
- click → opens the annotation editor (thumbnail disappears)
- drag → carries the PNG out as a real file — drop it into Explorer,
browser upload fields, chats, e-mail (plus bitmap data for image-paste targets)
- right-click → pin / copy / save-as / open / show-in-folder
- untouched → fades away on its own
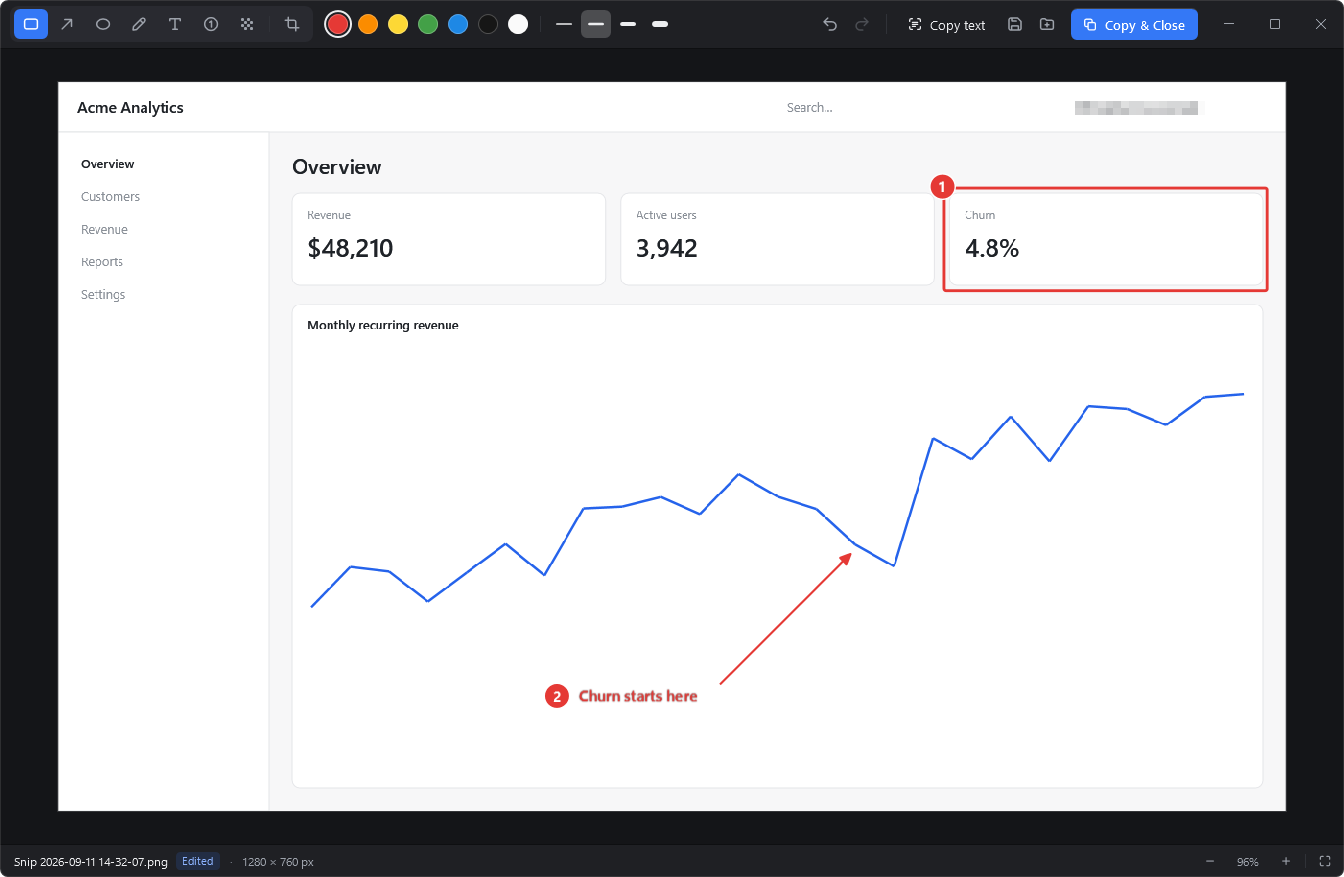
- The editor (frameless, dark, one toolbar row): rectangle, arrow,
ellipse, freehand, text, numbered step badges (1→2→3),
redact/pixelate (hide API keys and secrets before sharing), crop,
7 colors, 4 stroke sizes, undo/redo, zoom. The window opens at the size of
the snip; on a narrow window the colors and sizes fold behind a color chip.
Copy Text runs Windows OCR over the snip and puts the recognized text on
the clipboard. Copy & Close (Ctrl+Enter) puts the annotated image on the
clipboard and exits — no confirmation dialogs, ever. Closing always saves
silently and refreshes the clipboard, so what you paste is what you drew.
Editor shortcuts
| Key | Does |
|---|
R A O P T N B C | Rectangle, arrow, ellipse (oval), pen, text, step number, redact (blur), crop |
[ / ] | Thinner / thicker stroke (also sizes text and step badges) |
Enter / Esc | Apply / cancel a crop; finish / discard a text label |
Ctrl+Z / Ctrl+Y | Undo / redo |
Ctrl+C | Copy the annotated image |
Ctrl+Enter | Copy, save and close |
Ctrl+S | Save over the snip file |
Ctrl+wheel | Zoom at the cursor |
Ctrl+Plus / Ctrl+Minus | Zoom in / out |
Ctrl+0 / Ctrl+1 | Fit to window / actual pixels (100% is pixel-for-pixel at any display scaling) |
Screen recording
-
Press Win+Shift+D (rebindable) — a live overlay opens with three pick
modes: Region (drag), Window (click one), Screen (click a
monitor). Keys R/W/S or 1/2/3 switch modes; Esc cancels.
-
Recording starts immediately: a red border marks the region and a small
HUD pill shows elapsed time with pause and stop. Neither appears
in the video. Press the hotkey again (or the HUD stop) to finish.
-
The MP4 is saved to \Recordings\, lands on the clipboard
as a pasteable file, and a floating thumbnail appears — click it to
open the trim editor.
-
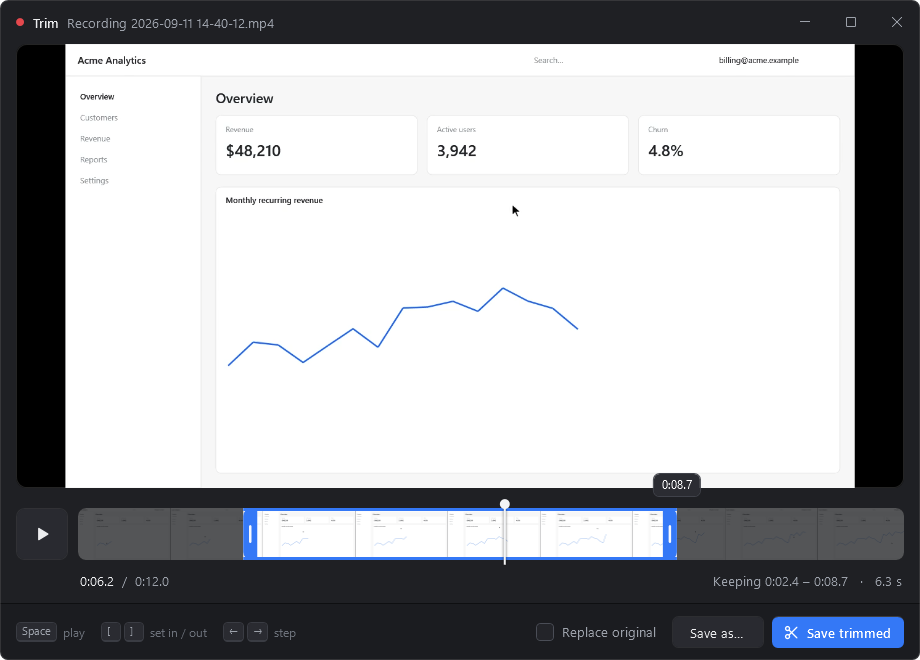
Trim: a filmstrip timeline with draggable in/out handles, a playhead and
a time bubble while dragging; the readout under it says exactly what you
keep. Space plays the selection, [ / ] set the edges at the playhead,
←/→ step a frame (Shift: a second). Save trimmed writes a
frame-accurate (trimmed) copy next to the original with its progress in
the button, Save as… asks where to put it, or tick Replace original.
Choosing where a recording lands. Recordings file themselves under
Recordings\ so a take is never lost to a dismissed dialog. To put one
somewhere else, use Save as… on its thumbnail — it moves the MP4 and
re-points the card, so dragging it out afterwards drags the file you chose.
If you would rather be asked every time, tick Ask where to save each
recording when it stops in Settings; cancelling that dialog still leaves the
file in Recordings\.
Details that matter:
- Capture ladder: Windows.Graphics.Capture (OCR flavor — the only API
that sees hardware-overlay/MPO video planes, i.e. browser video playback)
→ DXGI Desktop Duplication → GDI.
%APPDATA%\WinSnipper\recorder.log
records which path each recording used.
- Encoding: H.264 MP4 via a Media Foundation sink writer (hardware
encoder when it cooperates), constant frame rate with wall-clock-correct
timing, a keyframe every second so seeking/scrubbing stays instant.
15 / 30 / 60 fps and cursor on/off in Settings.
- DRM-protected content (Netflix and friends) records black — the OS
enforces that for every capture tool.
WinSnipper.exe --trim opens the trim editor directly.
Auto-delete
Optional (Settings): recycle snips and recordings older than 7–90 days.
Files go to the Recycle Bin, never hard-deleted, and only files WinSnipper
itself created are touched.
Why the hotkey override works
A WH_KEYBOARD_LL hook sees Win+Shift+S before the Windows Snipping Tool does
and swallows it (the same mechanism AutoHotkey uses). The hook runs on its own
dedicated thread: Windows delivers the callback on whichever thread installed
it, and a hook sitting behind a busy UI thread eventually blows through
LowLevelHooksTimeout, at which point Windows hands the keystroke to the shell
anyway and the built-in Snipping Tool opens on top of you. A thread that does
nothing else answers in microseconds however busy the app is.
Windows 11 has a second door into the same tool: bare PrintScreen. That one
is a Windows setting rather than a hotkey, so Replace the Windows Snipping
Tool (on by default) turns it off and captures on PrintScreen instead. It is
the one thing WinSnipper writes outside its own folder — a single
HKCU\Control Panel\Keyboard value, whose previous state is recorded first.
Unticking the setting, or tools\winsnipper.ps1 uninstall, puts it back
exactly as it was. Win+Shift+S needs no registry change at all.
Settings
Tray icon → Settings…
- Rebind the snip and recording hotkeys (any modifier combo — recorded live,
including Win-combos)
- Replace the Windows Snipping Tool: also capture on PrintScreen, and stop
Windows opening its own overlay on that key (on by default, reversible)
- Recording frame rate (15/30/60) and cursor visibility
- Ask where to save each recording when it stops (off by default)
- Thumbnail auto-dismiss time (1–15 s)
- Snips folder (recordings go to its
Recordings subfolder)
- Auto-copy to clipboard on/off
- Auto-delete old captures (off by default; Recycle Bin only)
- Start with Windows
Stored in %APPDATA%\WinSnipper\settings.json.
OCR languages
OCR lives in the WinSnipper-OCR.exe flavor (the lite build hides all OCR UI).
"Copy Text" uses Windows' built-in OCR. It picks the best engine it can find:
Croatian → your profile languages → English → anything installed.
OCR language packs are Windows components, so they can't ship inside the app —
but WinSnipper's Settings shows your OCR status and offers a one-click
install of the pack for your language (a UAC prompt + ~1 minute download).
Equivalent manual command from an admin PowerShell:
Add-WindowsCapability -Online -Name "Language.OCR~~~hr-HR~0.0.1.0" # your tag here
Small snips are upscaled automatically before recognition, which significantly
improves accuracy on terminal-size text.
Build
dotnet build -c Release                     # dev build (lite)
pwsh -File tools\winsnipper.ps1 build -Flavor both  # single-file builds
Use the build script when publishing into dist: it pauses the keep-alive
watchdog, stops the running app, builds both flavors and restores its running
state. Publishing there directly can race the watchdog and hit a locked exe.
tools/gen-icon.ps1 regenerates assets/icon.ico.
Per-Monitor-V2 DPI aware; all selection math is done in physical pixels, so
crops are pixel-exact on scaled and mixed-DPI displays.
Roadmap
Ideas queued up — PRs welcome:
- Audio in recordings — mic and/or system loopback (WASAPI)
- GIF export — for the places MP4 can't go
- Color picker — grab the hex of any pixel on screen
- Snip history — browse recent snips from the tray
- Highlighter pen, line tool
- Re-editable annotations (select / move / delete individual shapes)
Docs
- Architecture — component map and the decisions behind it
- Contributing — build, smoke test, ground rules
- Changelog
- Performance — capture benchmark, opening timings,
diagnostics, and what is measured versus reasoned in each round of
capture-speed work
Credits
Built by Marko Matošević (Version2) together
with Claude (Anthropic) — designed, written, and shipped in a pair-programming
loop: human direction and testing, AI implementation.
License
MIT