Google Assistant Preview Melvin Abraham
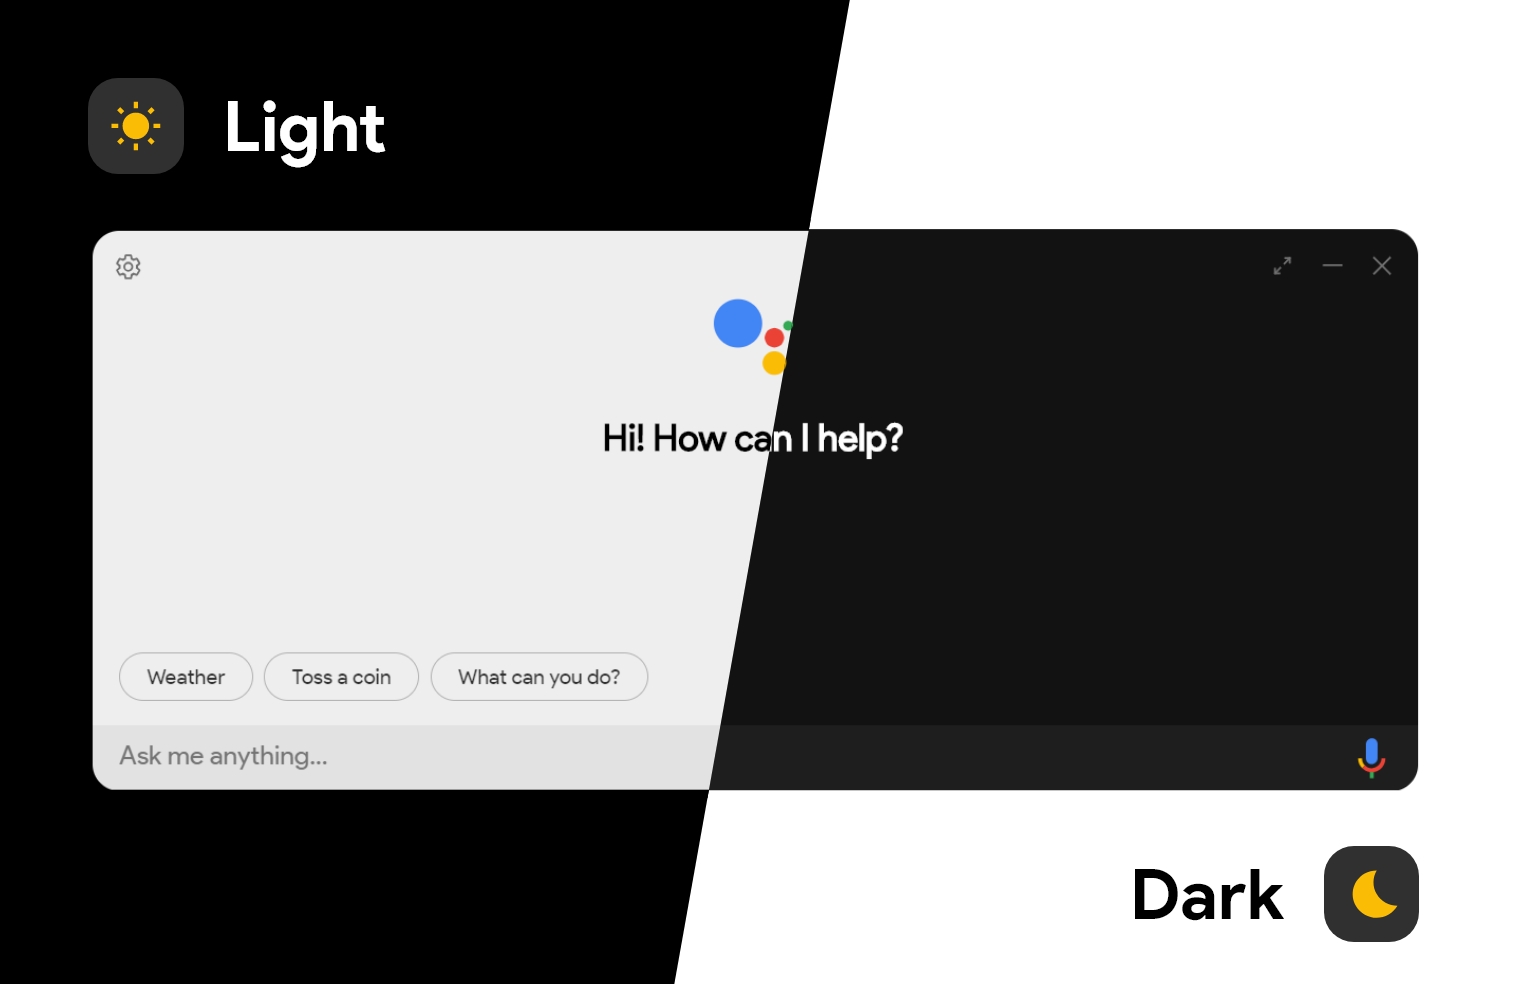
winget install --id=Melvin-Abraham.Google-Assistant.Preview -e
A cross-platform unofficial Google Assistant Client for Desktop (powered by Google Assistant SDK)
Google Assistant Preview is a cross-platform software designed to bring the functionality of Google Assistant to desktop environments. Built using the Google Assistant SDK, this tool allows users to interact with Google Assistant directly from their desktops.
Key Features:
- Integration with Google's ecosystem for seamless voice commands and responses.
- Natural language processing capabilities to understand and execute user requests.
- Visual feedback interface for enhanced interaction.
- Cross-platform support, enabling use on multiple operating systems.
- Security features to protect user data and ensure privacy.
Audience & Benefit: Ideal for users who want a desktop experience integrated with Google services. This tool enhances productivity by allowing voice interactions with applications, information retrieval, and task management directly from the computer interface.
Installation can be done via winget, ensuring ease of setup.
README
Google Assistant Unofficial Desktop Client
[
][issues]
[
][license]
[
][top-lang]
[
][next-milestone]
Google Assistant Unofficial Desktop Client is a cross-platform desktop client for Google Assistant based on Google Assistant SDK.
> Note: > --- > > The "Google Assistant Unofficial Desktop Client" is under development. So, if you find any bugs or have any suggestion, feel free to post an issue or a pull request.
Inspiration
The design is inspired by Google Assistant in Chrome OS and comes in both Light Mode (beta) and Dark Mode ๐.
Download
You can build the assistant on your machine if you prefer (see How to Build). If you don't want to build the project for yourself, you can download the Assistant Setup/Installer for the respective platform from here (releases). You can download from other official sources as well.
Windows (using winget
)
> If you are on Windows 11, chances are you have winget
pre-installed.
> If you are on older version of Windows (Windows 10) and don't have it installed, check out
> Install Winget
> documentation section to learn how to install it.
โก Stable versions:
PS> winget install "g-assist" -e
๐งช Preview Versions (Pre-release versions):
PS> winget install "g-assist-preview" -e
MacOS (using brew
)
> Visit brew.sh to learn how to install brew
if you don't have it
> installed on your machine.
$ brew install --cask google-assistant
Linux (using snap
)
> Some linux distros like Ubuntu, KDE Neon, Manjaro, Zorin OS, etc. come pre-installed with
> snap
. For distros without out-of-the-box support for snaps, visit Installing snapd
> documentation page.
Manually download from the Snapstore:
โก Stable versions:
$ sudo snap install g-assist
๐งช Preview versions (Pre-release versions):
If you want to install release candidates:
$ sudo snap install g-assist --candidate
If you want to install beta versions:
$ sudo snap install g-assist --beta
Getting Started
In order to use the client, you must have a "Key File" and "Token" for authentication which you can get by going through Device Registration process. You can go through the wiki given below to get started.
"Setup Authentication for Google Assistant Unofficial Desktop Client" Wiki (For both Device Registration & Authentication help): > https://github.com/Melvin-Abraham/Google-Assistant-Unofficial-Desktop-Client/wiki/Setup-Authentication-for-Google-Assistant-Unofficial-Desktop-Client
Other References
If you want a user friendly registration method, use Device Registration UI: > https://developers.google.com/assistant/sdk/guides/library/python/embed/config-dev-project-and-account
If you want to use a CLI tool to complete the Device Registration and Authentication process manually, read the following: > https://developers.google.com/assistant/sdk/reference/device-registration/register-device-manual
After you have registered your device and downloaded the required authentication files, you can head on to Settings and set the "Key File Path" and "Saved Tokens Path" to the location where the respective files are located.
Want to Contribute?
You are more than welcome to contribute to all kinds of contributions:
- ๐ค Request/Suggest a feature
- ๐ Report a bug
- ๐ Make this documentation better
- ๐ป Contribute with the code
Before you start, we highly recommend you check the Google Assistant Unofficial Desktop Client's contributing guidelines.
Default Keyboard Shortcut
- Windows: Win + Shift + A
- MacOS: Cmd + Shift + A
- Linux: Super + Shift + A
Note: Keyboard shortcut is configurable in the settings
Other Libraries Used
-
p5.js:
- For visualization purpose when the user speaks through mic.
- Link: https://p5js.org/
-
aud_player.js:
- For playing audio through speakers.
- Link: https://github.com/ItsWendell/google-assistant-desktop-client/blob/develop/src/renderer/providers/assistant/player.js
-
microphone.js:
- For recording audio using Web API.
- Link: https://github.com/ItsWendell/google-assistant-desktop-client/blob/develop/src/renderer/providers/assistant/microphone.js
-
google-assistant:
- Node.js implementation of the Google Assistant SDK
- Link: https://github.com/endoplasmic/google-assistant
-
bumblebee-hotword:
- A minimalist hotword / wake word for the web, based on Porcupine
- Link: https://github.com/jaxcore/bumblebee-hotword
[next-milestone]: